March is Buckler & Targa Month for my Beyond the Basics of Italian Rapier class, and we kicked things off by looking at some buckler fundamentals.
In this blog, I’m focusing primarily on the round buckler and the square/wavy targa, but this can be carried over to other buckler-like objects such as the various talhoffer bucklers.
In the class I tend to jump back & forth between shapes to show how I’d change things a little based on the item’s design, but my grip approach is more or less always the same.
Historical Notes
Some background history on the buckler before we begin.
We see a lot of buckler use in the 16th Century Italian text, in the Bolognese style of swordsmanship (Achille Marozzo, Giovanni dall’Agocchie, etc.). However, once we get into the late-Renaissance Italian masters, where the thrust is the primary attack, the buckler isn’t really covered in great detail.
Nicoletto Giganti skims on the topic of buckler and targa use in his second book. We get two basic plates of each defensive arms and basic advice which boils down to “use it like a dagger.”
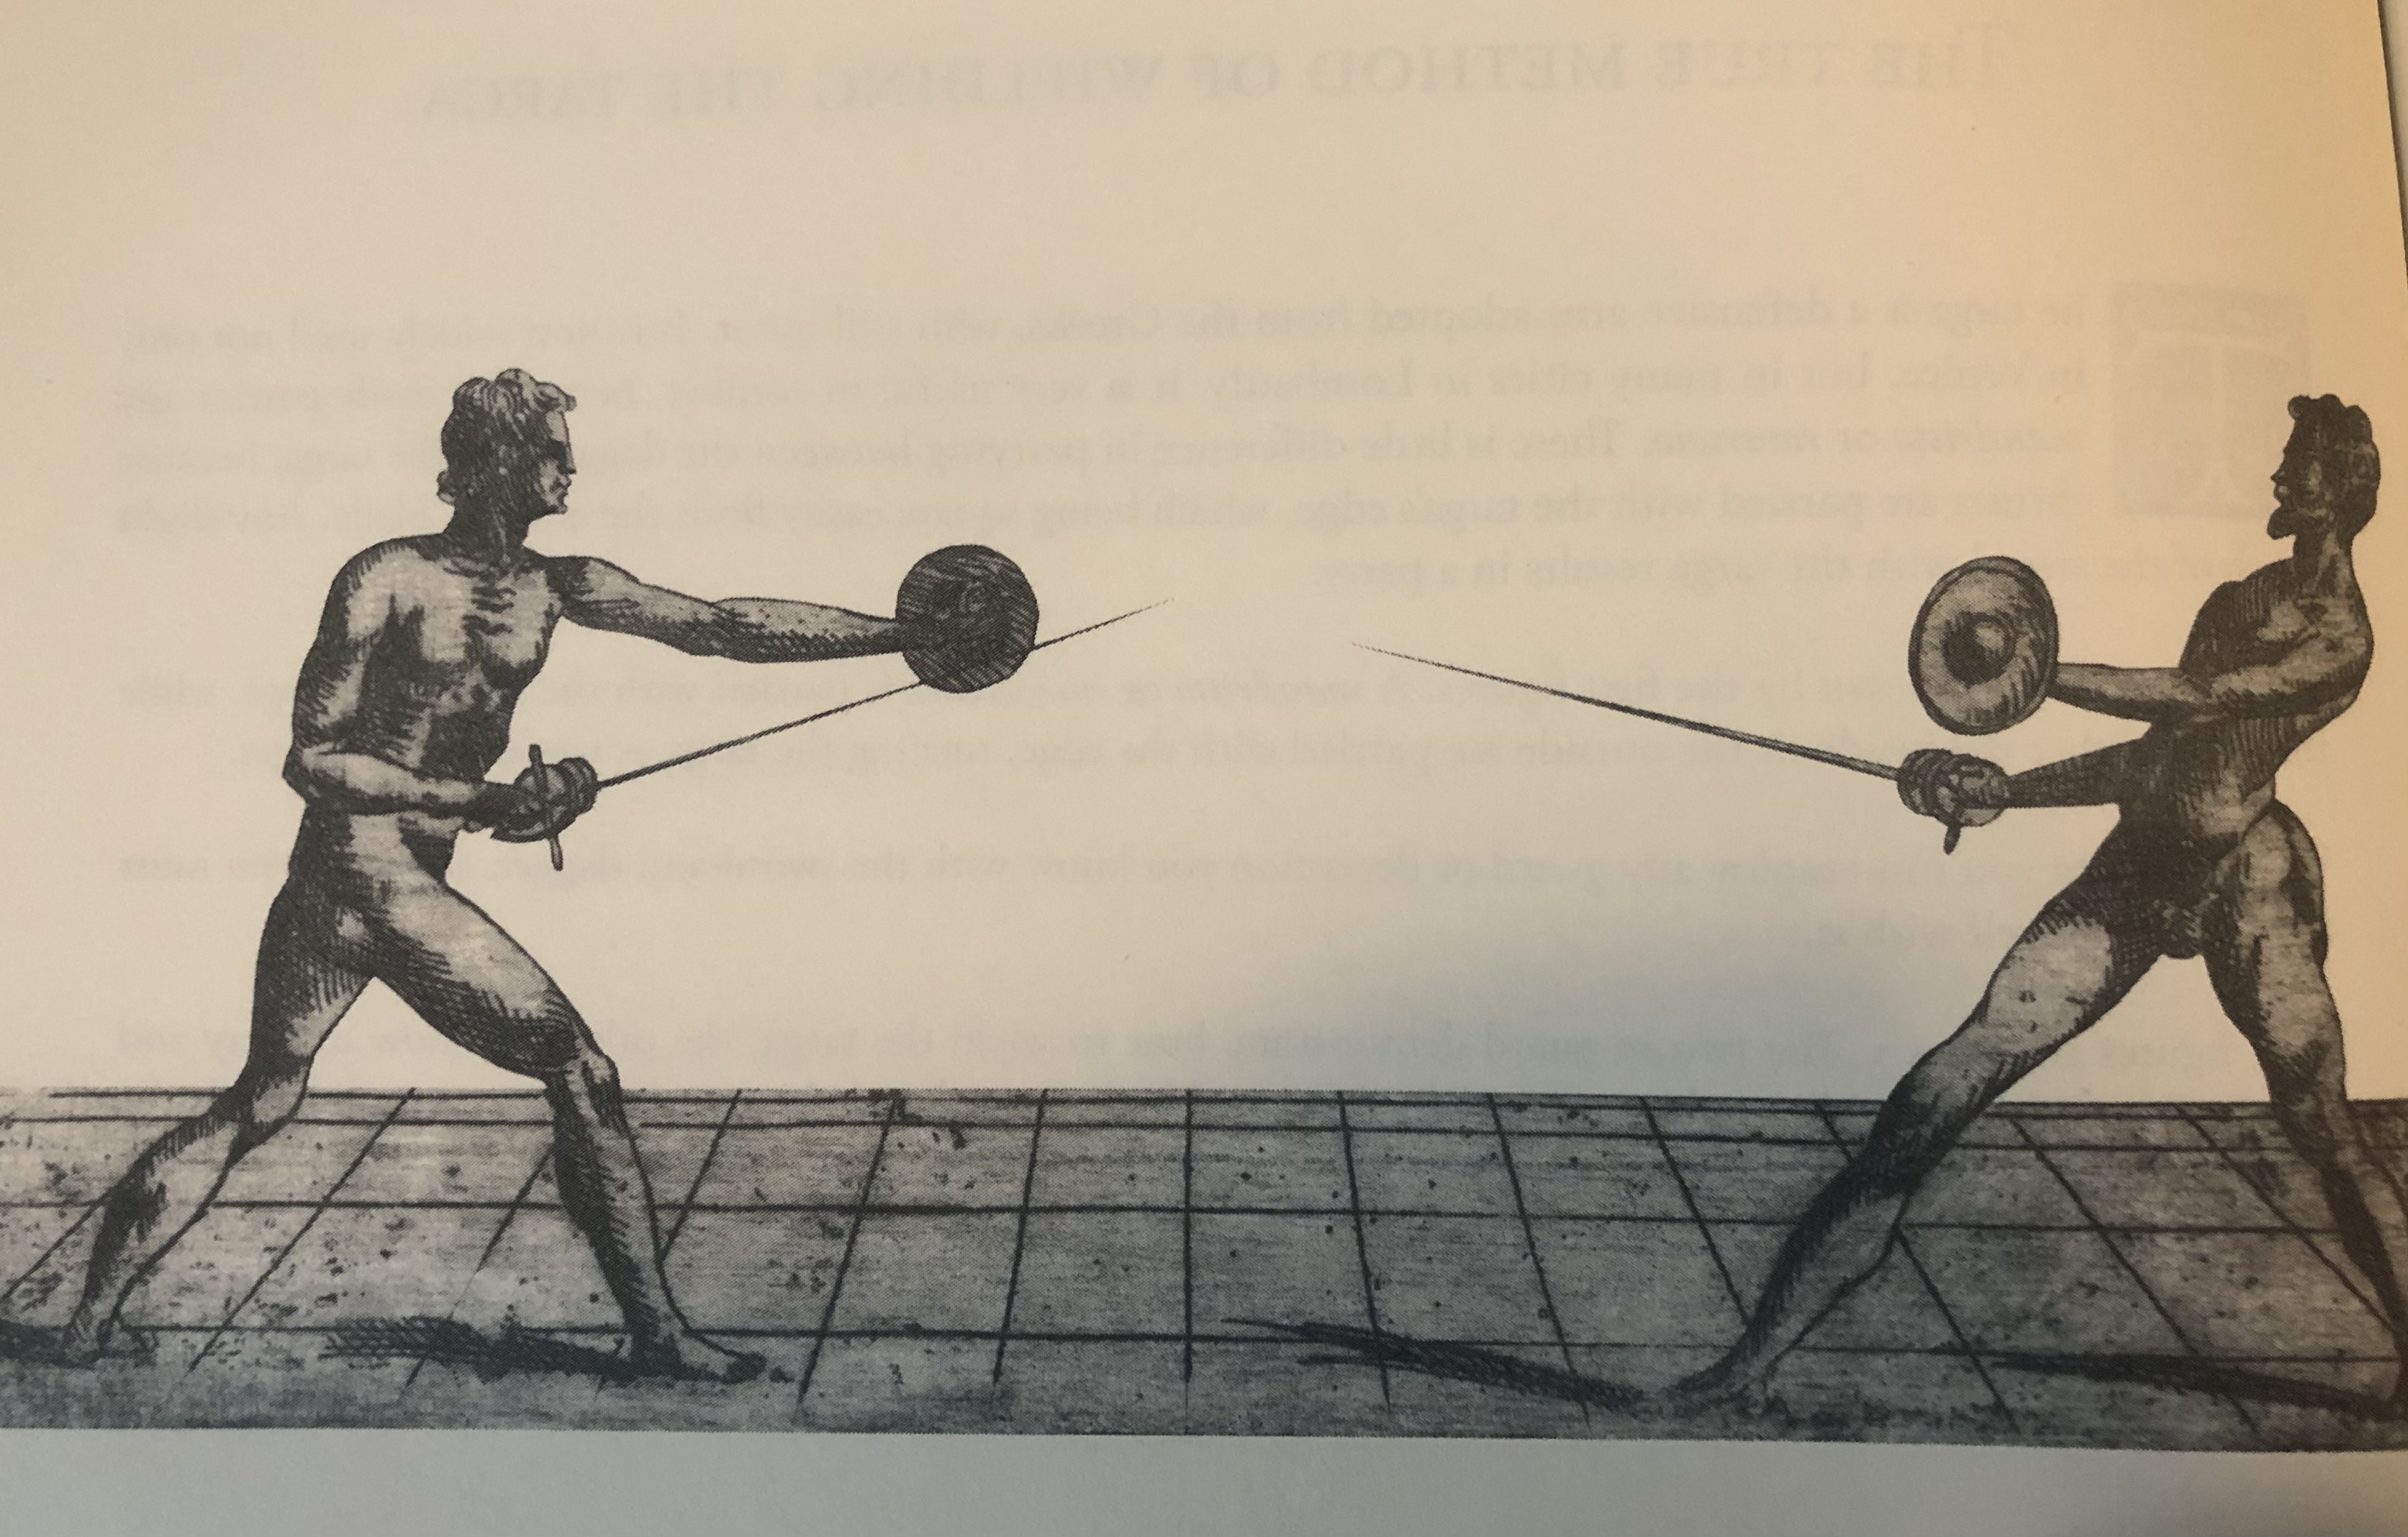
Ridolfo Capoferro has no buckler advice but does show rotella; however, that’s a different enough beast in my mind to not be very relevant.
Salvator Fabris provides no direct buckler or targa chapters but does say that if you understand his system you can adapt it to other forms not covered in his text. One, he’s right and two, there’s a cool paper that extrapolates on this idea that y’all should check out.
Francesco Alfieri has one page on the buckler & targa that boils down to the same advice as Giganti — “use my dagger guards and use this like a dagger.”
We can throw Giacomo di Grassi into the mix, too. I’d say he’s more “sidesword” in style than “rapier”, but he does have sword & buckler/target use in his writing that’s worth taking a look at. However, he doesn’t talk about gripping the buckler, just where to hold it out in space.
Marco Docciolini, however, talks a bit about the grip and how to fight with buckler but his work is usually put in the sidesword category. Fortunately, you can easily take principles from Bolognese sidesword systems and implement them into Italian rapier pretty easily.
So not a lot of early-17th C. rapier & buckler-specific material to go with. It’s not really until the late-17th Century/early-18th Century do we get another look at buckler/targa use in the Italian system.
Both Giuseppe Morsicato Pallavicini (1673) and Nicola Terracusa e Ventura (1725) go over some basic sword & buckler/targa advice in a little more detail and both operate in a thrust-centric system.
Two Ways to Hold the Buckler
There are two ways that I teach holding the buckler.
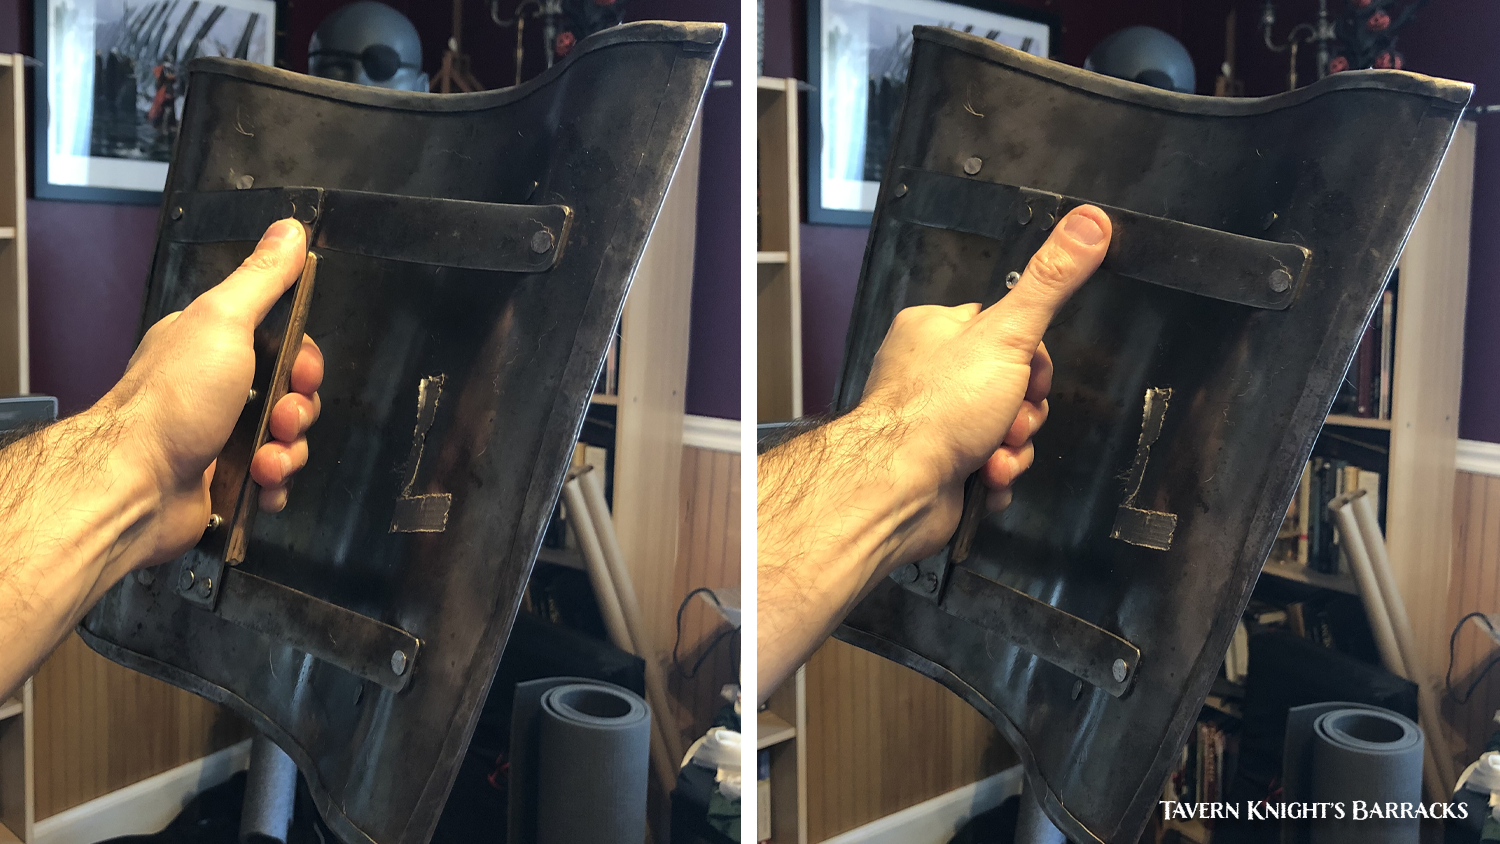
The first is with the thumb running along the flat of the handle.
The second, based off Docciolini & Pallavicini’s manuals, is resting just off to the side of the handle flat at about the 1:00 position (if you’re a righty). Pallavicini’s advice is, as follows:
“For the management of the sword and buckler, he must know how it must be gripped… I do not want, as some do, to rest the thumb on the straight line of the grip, instead I want the thumb, not reaching the plate of the buckler, there is a little cup attached next to the grip, that would have enough relief that the thumb can rest there, and so you will come to better endure the blow that could beat the buckler to the right side.”
Meanwhile Docciolini writes:
“I do not want your thumb to rest straight along the handle, as some practice. Instead I want your thumb, if it does not reach the flat of the buckler, to lodge against the screw next to the handle, which is raised enough for your thumb to rest there.”
The benefit of Pallavicini’s & Docciolini’s grip is it’s good at resisting shots to the right side of the buckler better (where a lot of shots are often aimed).
I think both are perfectly suitable for rapier & buckler with an edge to Pallavicini’s & Docciolini’s grip for the extra resistance.
The Arms n Armor Square Target has these little cups or ears that Pallavicini talks about. However, if your buckler doesn’t have them, you can still typically put your thumb at this 1:00 position if there’s enough of a horizontal flat near the top of the handle, a la Docciolini’s description. If not, putting it along the flat is sufficient.

Specifically, I hold the buckler similar to how I hold my dagger (or a badminton backhand bevel thumb grip). My hand is relaxed so it remains supple & nimble and only becomes more rigid when strength is in order.

Why a Relaxed Grip?
A few reasons:
- Improved endurance. Contracted muscles are expending a lot more energy than relaxed muscles. Better to save that energy for when it’s needed.
- Easier to move. A rigid muscle isn’t going to move as fluidly as a relaxed one. It’s also more prone to injuries. Similar to holding a rapier or dagger, we want to stay relaxed and only apply physical strength as and where needed.
- Creates a strong, defensive angle. This is a tactically important reason that we can utilize for stronger closed guards with the rapier & buckler. We’re going to look at this a little more closely in a bit.
Thumb-based vs. “Hammer”
First, let’s look at a common, and less-ideal, way some folks hold a buckler — the “hammer” grip.

The “hammer” grip (a poor name since you shouldn’t even hold a hammer like this…) has a few weaknesses. The first is it’s very easy for the buckler to spin around in your hand when there’s a shot to the sides. It’s really only strong directly in line with the handle, so any shot to the sides will spin the buckler like a turnstile and easily strike the wielder’s body. To keep it from spinning as easily, a fencer needs to grip harder/tighter which just unnecessarily taxes your body — not to mention it has extremely steep diminishing returns. Squeezing harder, in this case, doesn’t really add much more strength to structure.
Secondly, there’s no angle being made by your fist. The buckler is perpendicular to the ground, meaning if you want shots to skate off the buckler and out of presence, you need to angle it by bending your wrist, which weakens your body’s structure.
The more “backhand bevel thumb grip” or “dagger-esque” grip creates a natural angle in your fingers which, in turn, creates a natural angle of the buckler in your hand.

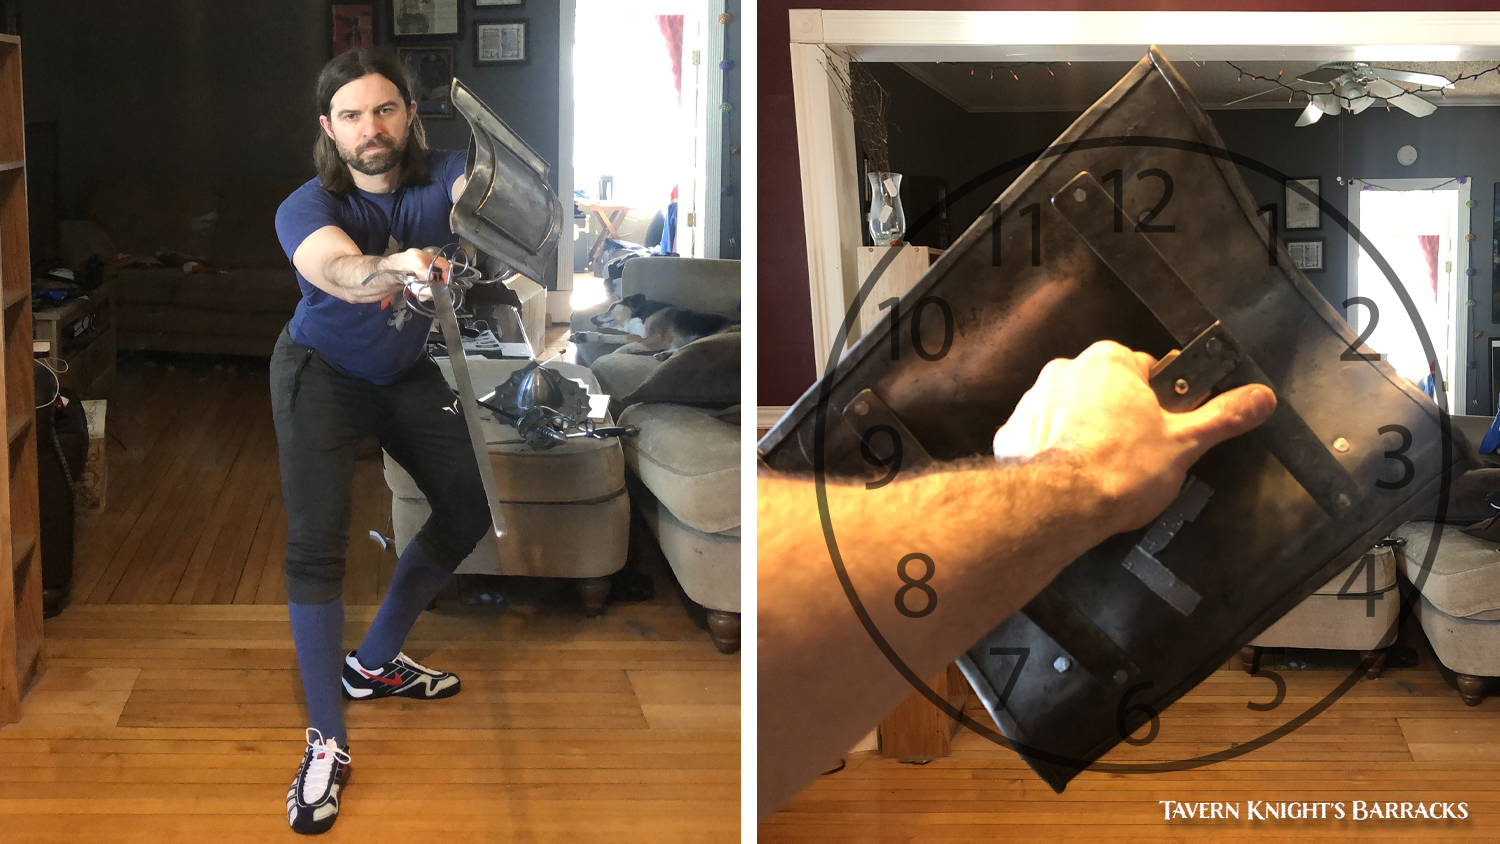
For instance, if held with your thumb at the 12:00 position, the top part of the buckler is inclined a little further forward toward our opponent, and the bottom edge closer to us. This allows us to redirect an opponent’s blade by using that angle without needing to break out wrist/forearm’s structure. Using the thumb also adds more strength to our grip, so it’s less likely to spin in our hand.
Using the Angle to Our Advantage
The key now is to use this slight angle to our advantage, and we can do this by turning the buckler clockwise or counterclockwise so our thumb is nearest to our sword hilt. Kinda like using a steering wheel. This changes the direction of our sloping angle to whatever direction we want. Typically, the way I teach it, I keep my thumb nearest to the hilt, so any attacks off of it will skate our of presence and not toward my open line.
Here’s this idea in action with seconda and quarta.
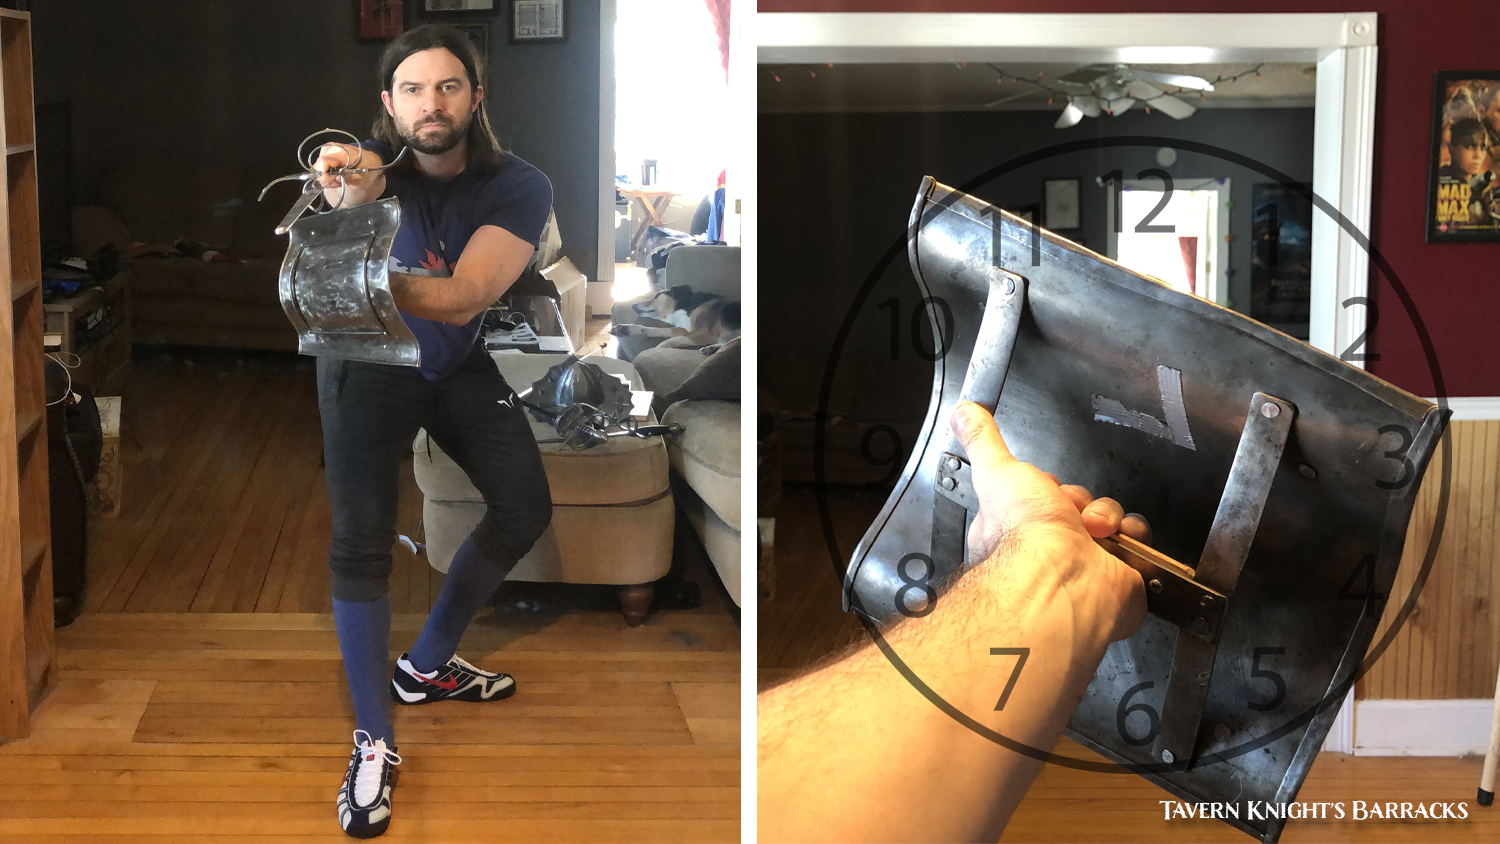
In seconda, my thumb is in a 10:00 position, creating an angle that would drive an opponent’s point toward my outside line (which I’ve closed off). The sword covers the high outside line and the buckler covers the low outside line. Together they make a closed guard.
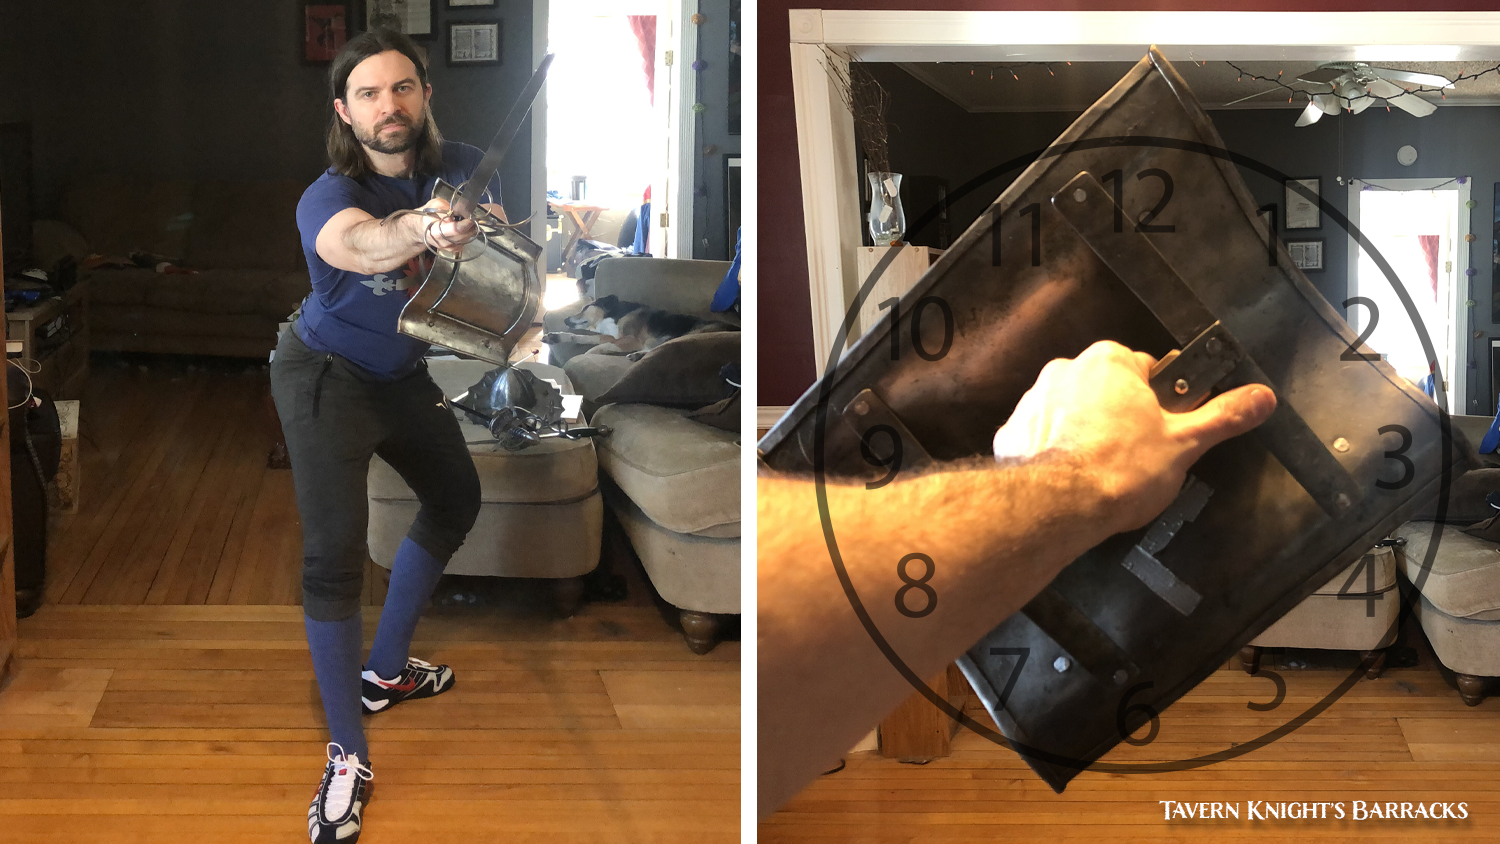
In quarta, my thumb is about 2:00 position, creating an angle that would drive my opponent’s point toward my inside line (which I’ve closed off). Similar to seconda, in quarta the sword is covering the high inside line and the buckler closes the low inside line.
We can also switch the position of the buckler and sword in quarta so the buckler is covering the high inside line and the sword covers the low inside line.
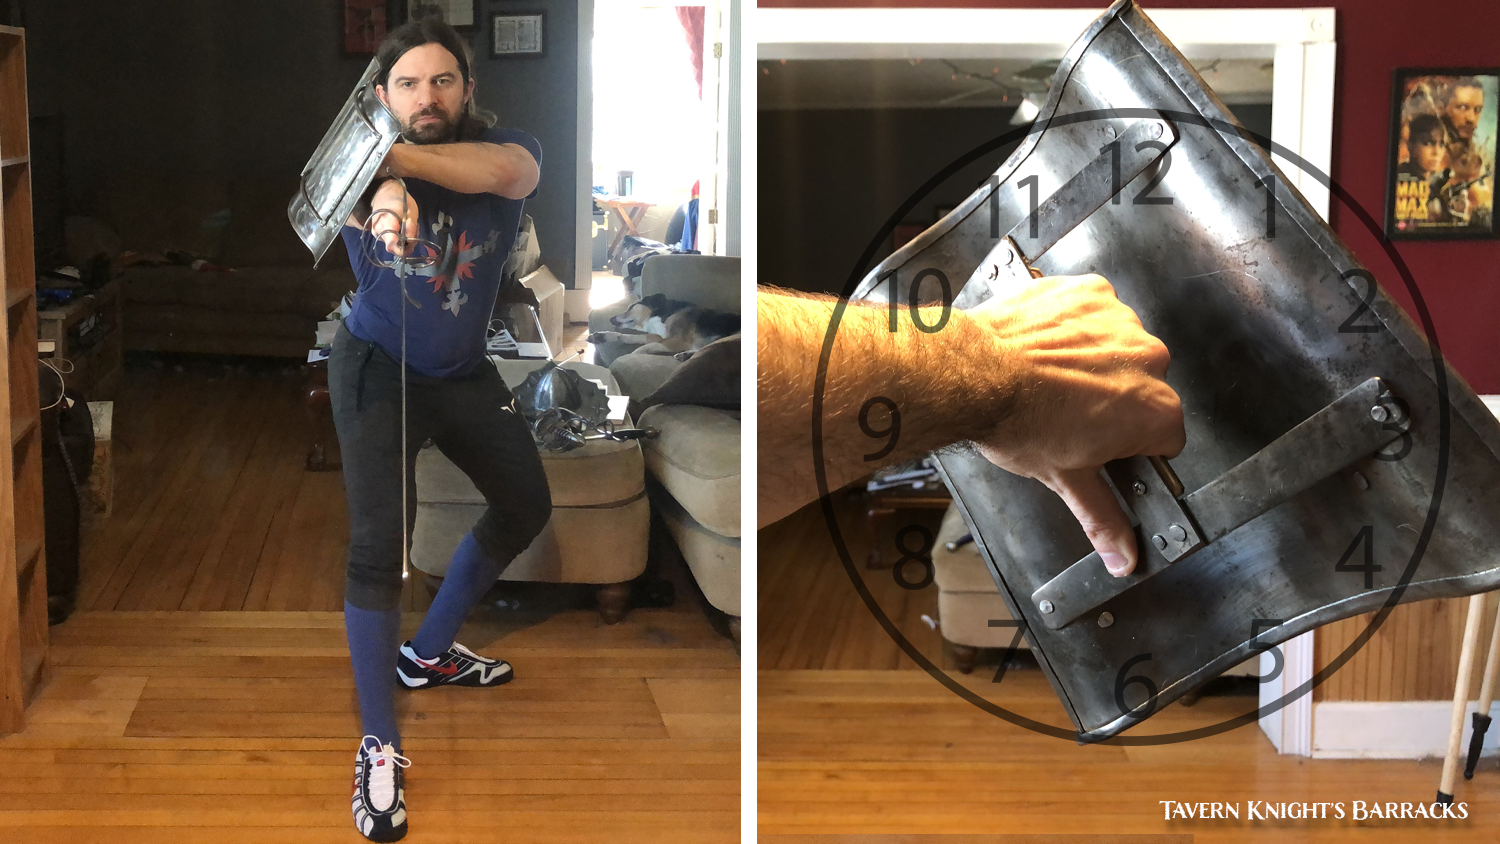
Terza with the buckler over the arm is the exception to the thumb-direction rule. My thumb isn’t near the hilt, but away from it in a 5:00 position.
Also important, by turning the buckler like a steering wheel (as the above guards demonstrate) and not opening/closing like a door (a popular way of parrying with the buckler) is that it keeps our fist, wrist and forearms in line, creating for a stronger and healthier body structure.
NOTE: If you’re using a long-tail talhoffer buckler, these thumb positions should probably look a little different. You want to balance the sloping angle the grip provides with the fact that you can force a bigger disengage with it’s length.

In general, if you’re using a non-round buckler, take note of the shape of the buckler and it’s features. That’ll help dictate how to best use it.
Transitioning Through Guards
So the idea of turning the buckler like a steering wheel is nice, but how does it work in combat?
I would recommend folks start off just by getting into their defensive terza stance and rotate into each of the four(ish) primary guards (prima, seconda, terza, quarta both high & low). After that, pick another guard to start off in and transition into the primary guards.

With the round buckler or square targa, you’ll find that transition to move pretty smoothly with a little practice. If you’re using something closer akin to the long-tail talhoffer, you may need to adjust things a little.
After that, we can work on some plays. Here are two simple plays that are bread & butter actions in the Italian Rapier system, but now done with a buckler in hand. You can do these with a partner, but also as solo transition drills at home, too.
DRILL/PLAY #1 – Outside Line Contratempo
Start off by finding your opponent’s blade on the inside line. Your buckler should be near your sword hilt, thumb at about 2:00. Having constrained the inside line & leaving the outside line open, your opponent disengages and lunges at you on your outside line. As they perform this, transition your sword & buckler (in unison) — the sword in seconda and the buckler under the hilt with the thumb turned to 10:00(ish).

DRILL/PLAY #1 – Inside Line Contratempo
Start off by finding your opponent’s blade on the outside line. Your buckler should be over your sword arm, thumb at about 5:00 OR under your sword arm in 10:00. Having constrained the outside line & leaving the inside line open, your opponent disengages and lunges at you on your inside line. As they perform this, transition your sword & buckler (in unison) — the sword in quarta and the buckler under the hilt with the thumb turned to 2:00(ish).
The goal in both of these two plays is to use the sword as the primary defender while the buckler is supporting the sword by covering the low line. You can, of course, use the buckler as the primary defender to keep the sword more free, but I’m less enthused about that approach with a round buckler.
Class Video
Here’s video of the first Rapier & Buckler class from 3/1/21, where we work through how to hold the buckler and the guard transitions. I also note how I change my approach based on the shape of the buckler.
Go Bs.
DONATIONS: If you find this blog post & class video useful, please consider a small donation so I can continue to produce rapier & other historical martial arts content. Donate at https://www.paypal.me/thetavernknight
NOTE: Thanks to Magdalena von Kirschberg & Bella di Sicilia for the steering wheel metaphor of turning the buckler!
Credit to Academie Duello for first introducing me to the clock/timestamp metaphor for the buckler positions.