We’re wrapping up rapier & buckler/targa month in my Beyond the Basics class. It’s been fun adapting Italian rapier to a form that’s pretty glossed over by the late-Renaissance masters.
Like I wrote in my last post, there’s not a ton about buckler/targa use in the late-Renaissance Italian rapier manuals (Fabris, Capoferro, Giganti, Alfieri). We either need to go back in time a bit into the “sidesword” tradition or move forward in time to the late-17th/early-18th century for more specific buckler advice.
Both of those are perfectly fine. It’s relatively easy to adapt Bolognese sidesword to Italian rapier and the Italians were still using rapier in the later half of the 17th C into the 18th C. But for this post, we’re sticking with early to mid-1600s.
In general, when it comes to buckler or targa use with the rapier, the Italian masters’ advice can be summed up as:
- Use the dagger guards
- Use the buckler similar to dagger
- All previous fencing principles still apply
We looked at how to hold the buckler/targa and some simple closed-guard transitions in the last post. This post will focus more on guard formations & postures. And while we go through these, we’re going to really focus on the above three points.
I want to also plug my buddy Donovan’s research paper into this very topic. He did a great project adapting Fabris’s dagger guards into buckler and it’s worth a read; there’s plenty of reference pics in the appendix.
This post is going to show mostly the square/wavy targa which can be used pretty similarly to a round buckler. I also show a few guards with the long-tail talhoffer buckler as an example of how to adapt guards to the shape & advantages of a buckler design.
We’re going to look at forming guards & postures in three ways:
- The sword extended & buckler withdrawn
- The sword withdrawn & the buckler extended
- Gaining & striking with buckler closed-guards
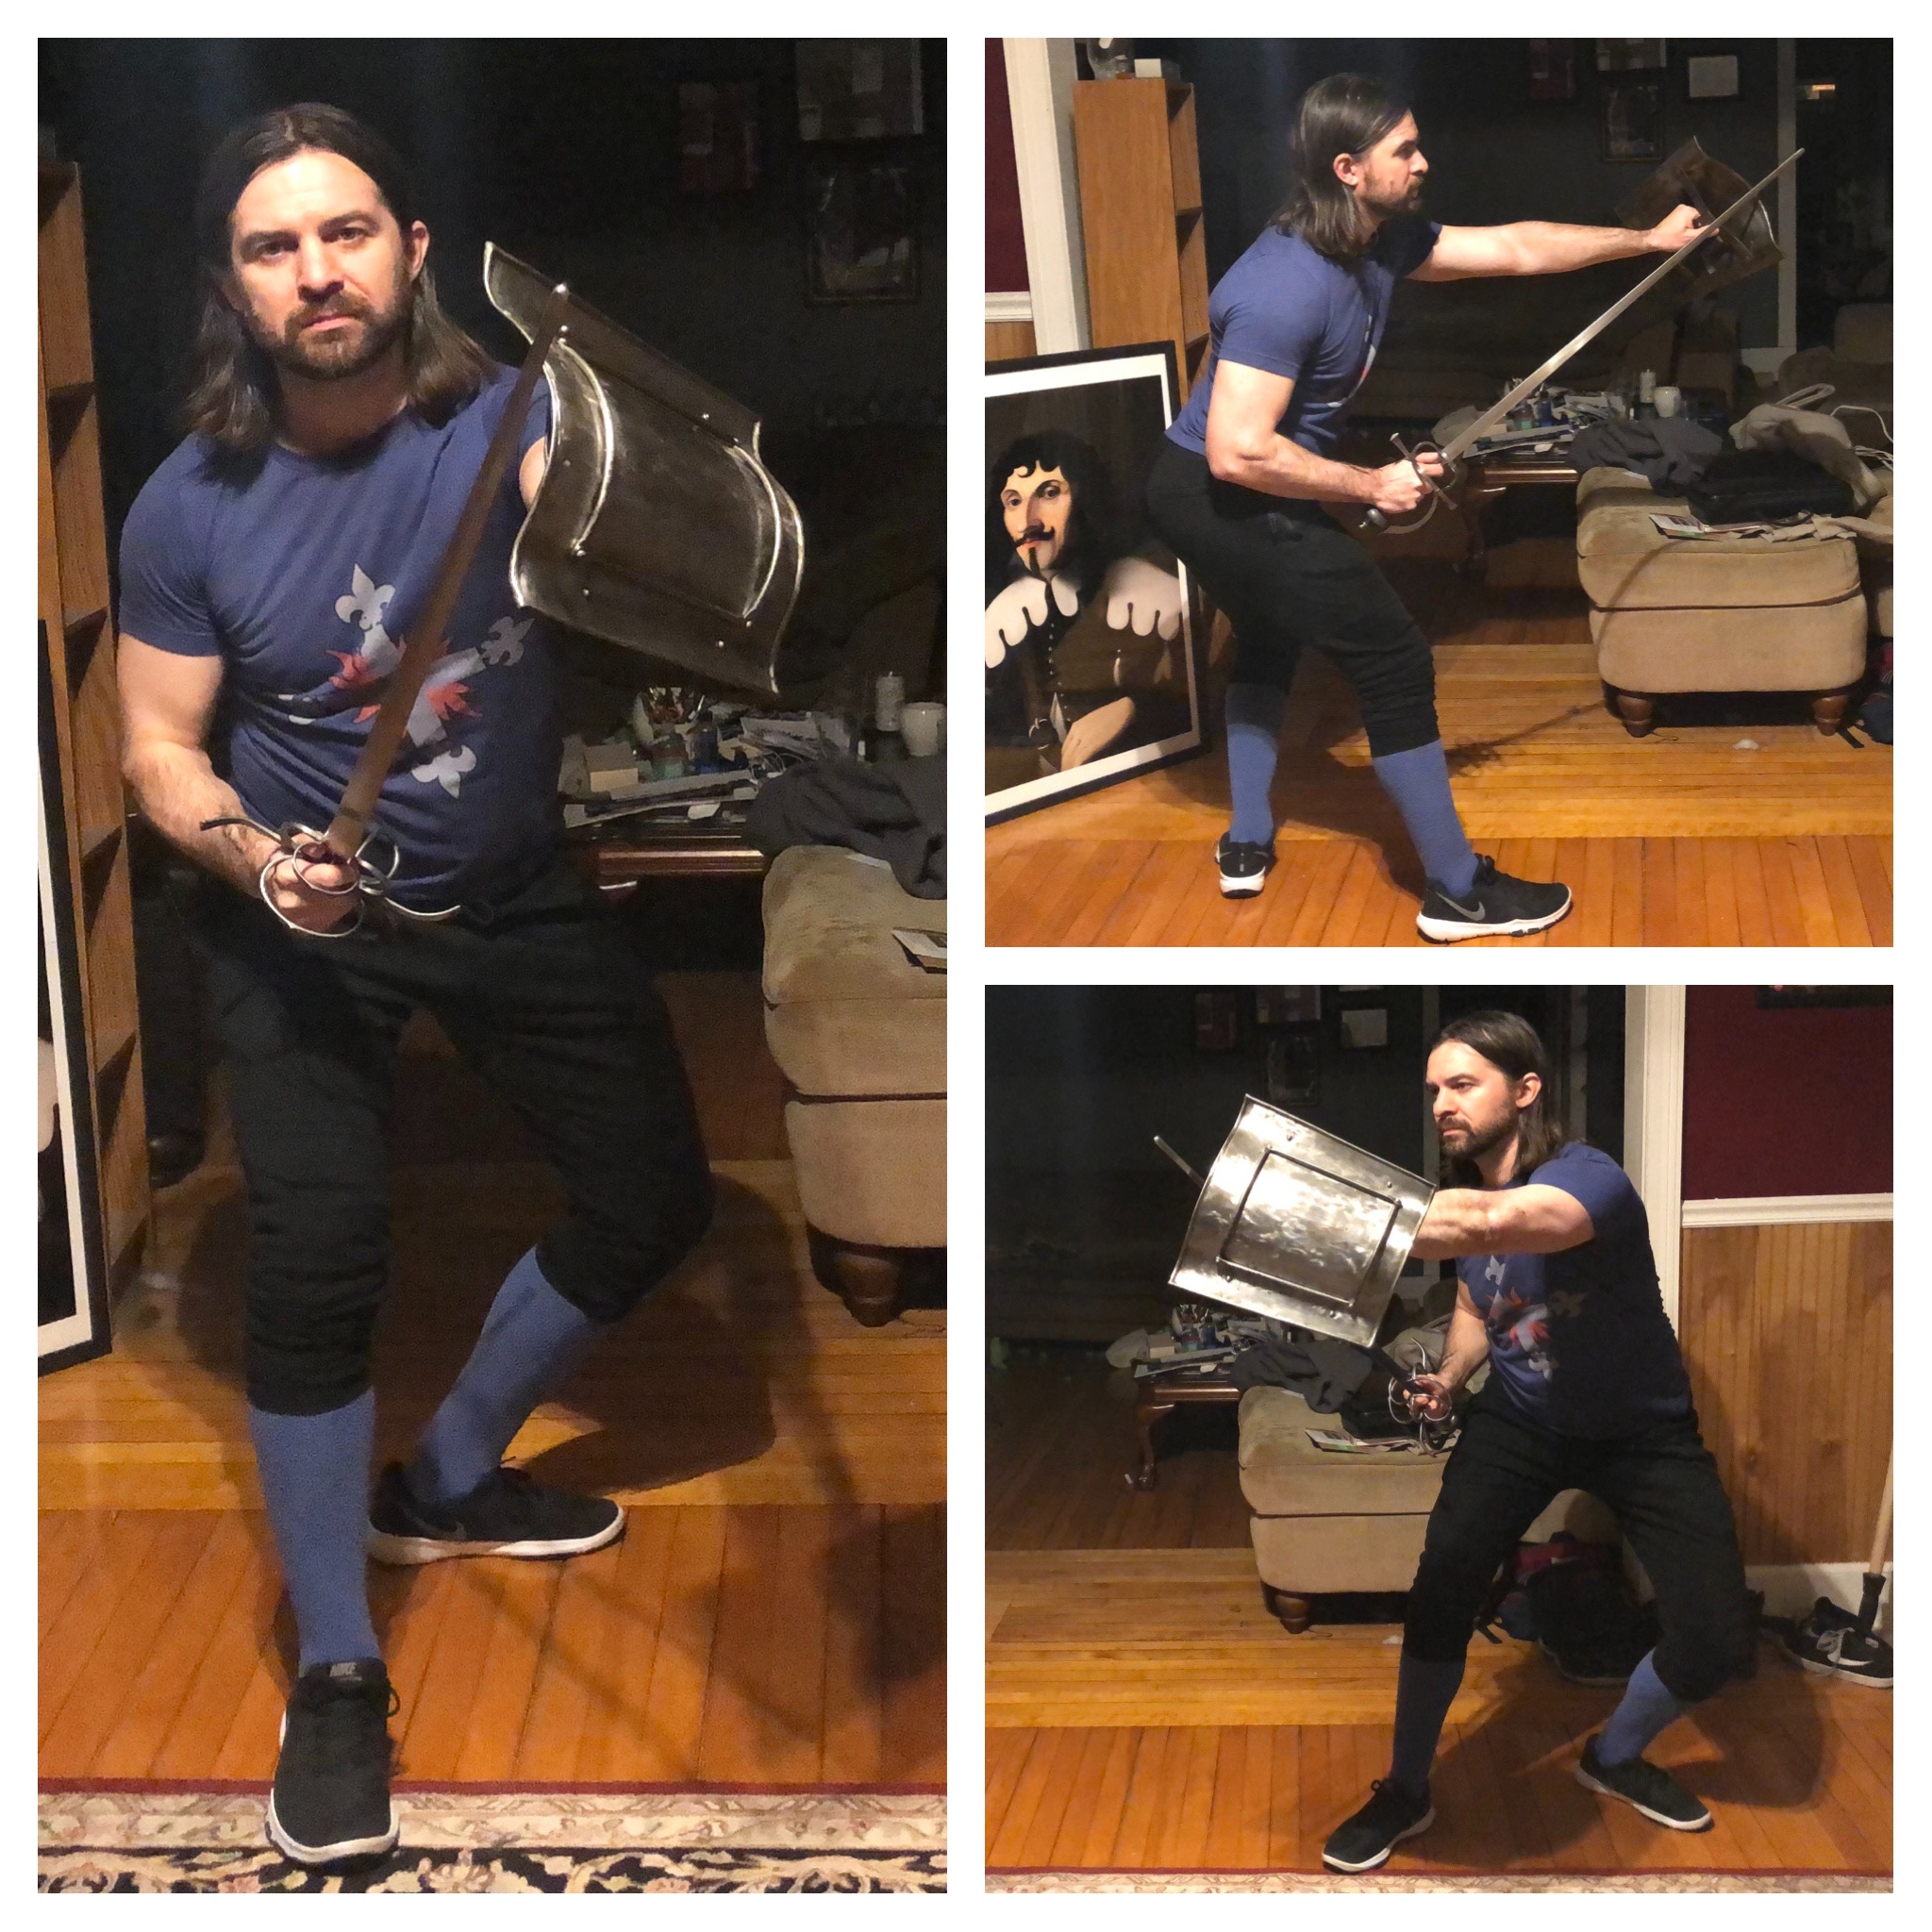
Sword Extended, Buckler Withdrawn
This is simply adapting out Defensive Posture to the use of buckler or targa. Fortunately this is super simple.
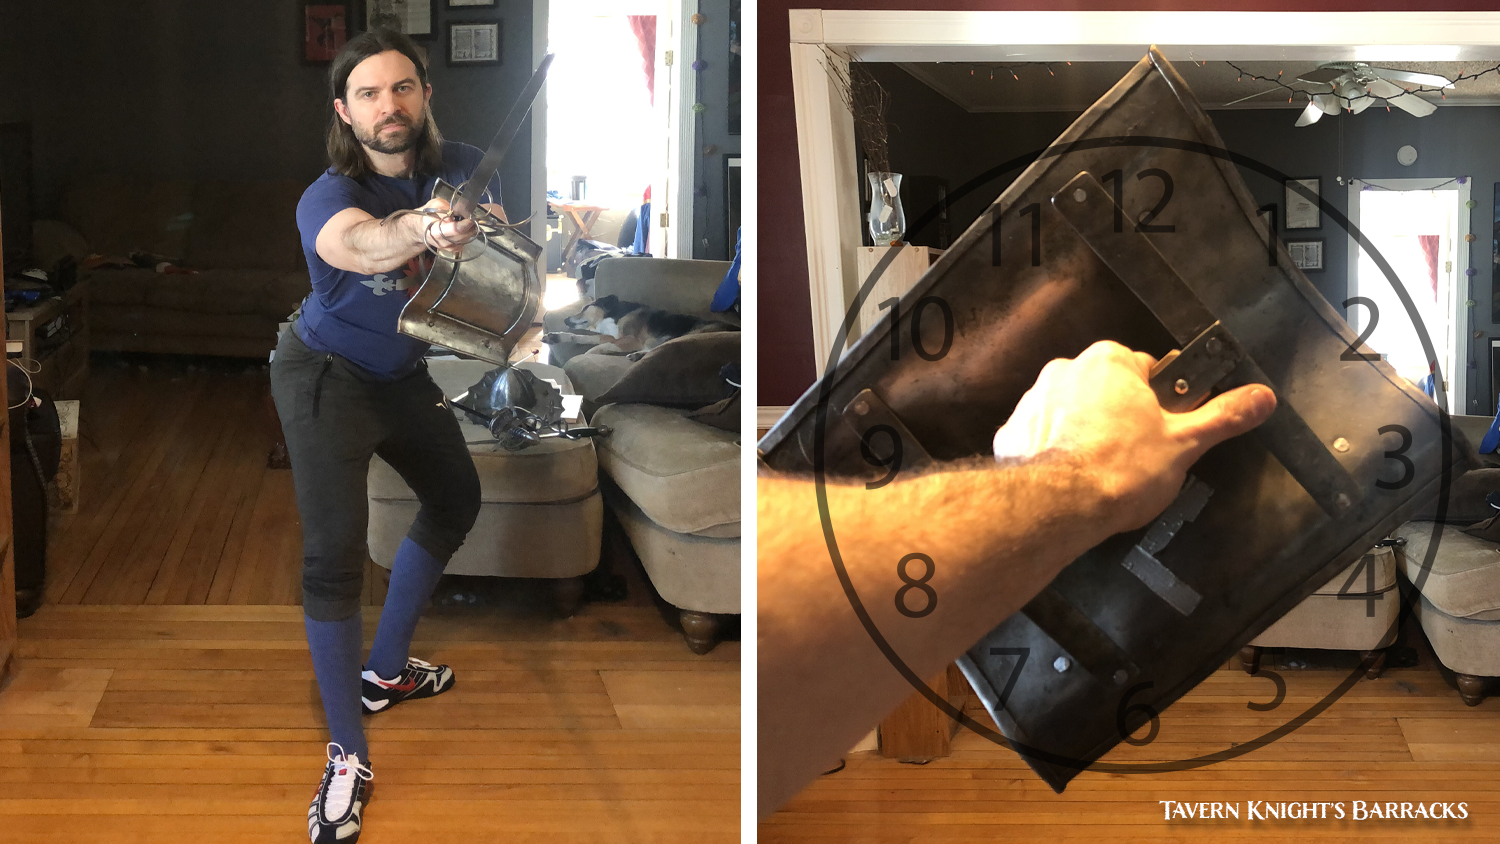
Your sword should still be in the same spot as with single rapier or rapier & dagger in this posture, the sword-arm more extended than not and roughly waist to lower-chest height. The buckler should also be held extended from the body to get more of the cone of defense effect.
You can have the buckler in front of your sword hilt or behind. Both are fine. I, personally, opt for behind the hilt because I prefer to do most of the work with the sword anyways and it assures that my buckler won’t get tangled with the sword’s quillons as I transition into different closed-guards.
However, if you have a very simple rapier hilt or are adapting sidesword to rapier, you may want to have the buckler in front of the sword for added hand protection.
Regardless, your hand position is most optimized if your hand is turned so thumb is held at about the 2:00 position. This creates a defensive angle in the buckler that will redirect any shots into the buckler out of presence to your inside line.

Finding the Blade
Finding/gaining the blade works pretty much the same as with single rapier or rapier & dagger. You find with the sword using the three advantages of crossing, true edge & leverage. Where your buckler is depends on the line your constraining.
On the inside line, I advise keeping your buckler in the same position and angle we discussed above — to the inside of the sword and the buckler hand position at about 2:00.
In this posture, your sword & buckler are heavily stringering the inside line and inviting on the outside line, allowing for simple controtempo attacks like below.

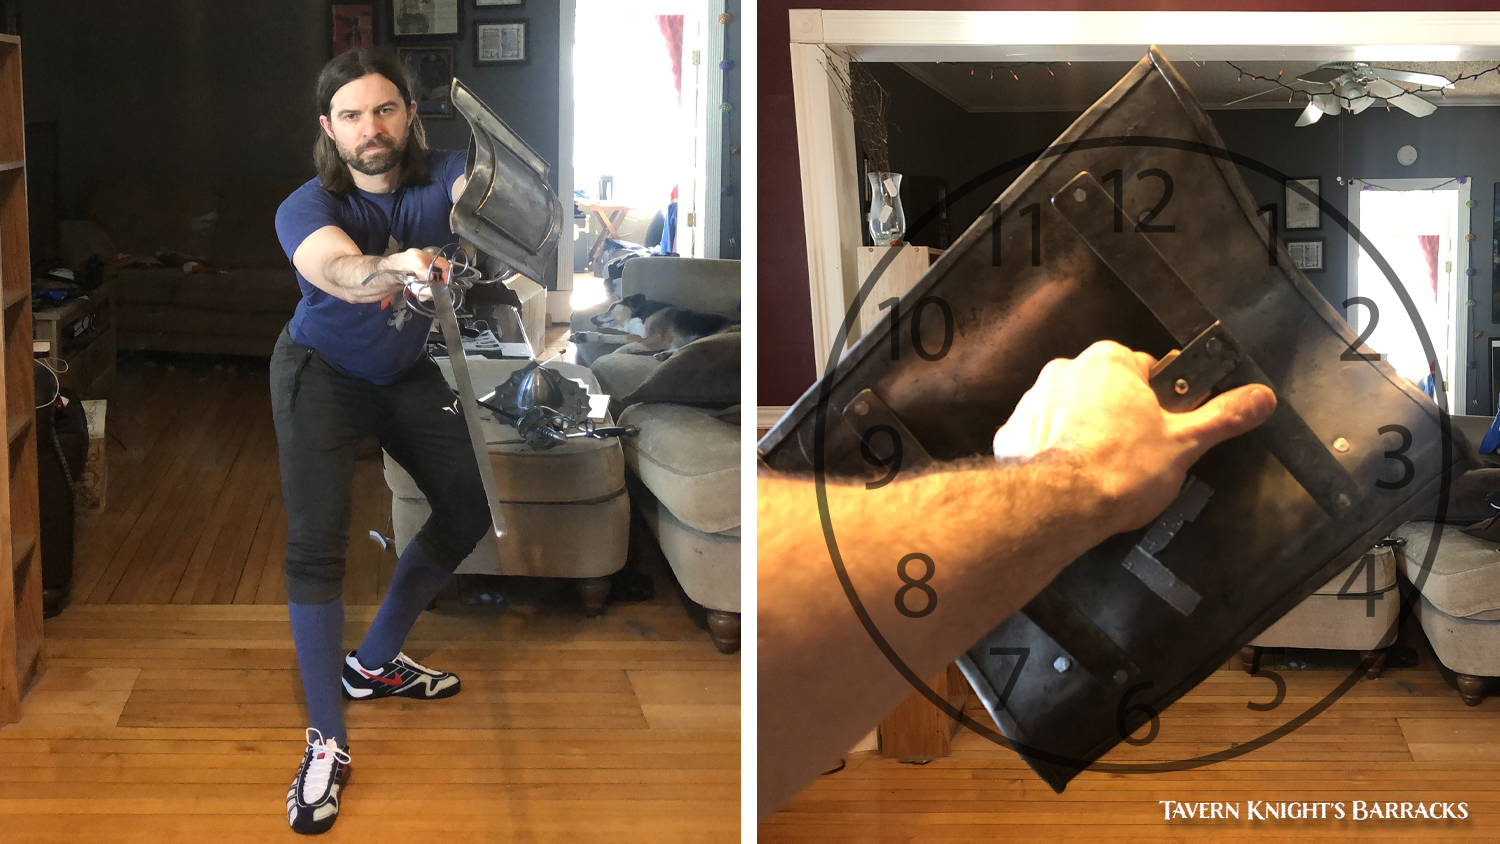
On the outside line, you have two options. The first is having the buckler “draped” over the sword arm, thumb position at about the 5:00 position. This really constrains the outside line and invites to the inside line. Your sword finds the opponent’s weapon using the three advantages listed above.
Similar to it’s inside line counterpart, this creates for a simple controtempo attack on the inside line.
The added benefit of this finding counterposture is that it gives the sword-arm some added protection. So if you find that you easily get struck in the sword-arm, this could help negate that a bit.
The other option for finding on the outside line has the sword at the same spot but putting the buckler under/beside the sword hilt. The sword still constrains the outside line.
The drawback of this counterposture is that it doesn’t invite as heavily to the inside line, so opponent’s are less likely to be very committed if they take the bait. However, you may find the transition from this finding into a closed-quarta easier than with the buckler draped over the arm. It also protects that lower flank and may be the better option against fencers who opt for the low voids or low-line attacks.
Either way, it’s important to remember that everything has advantages and drawbacks. Fencing is a lot of negotiating and give & take.
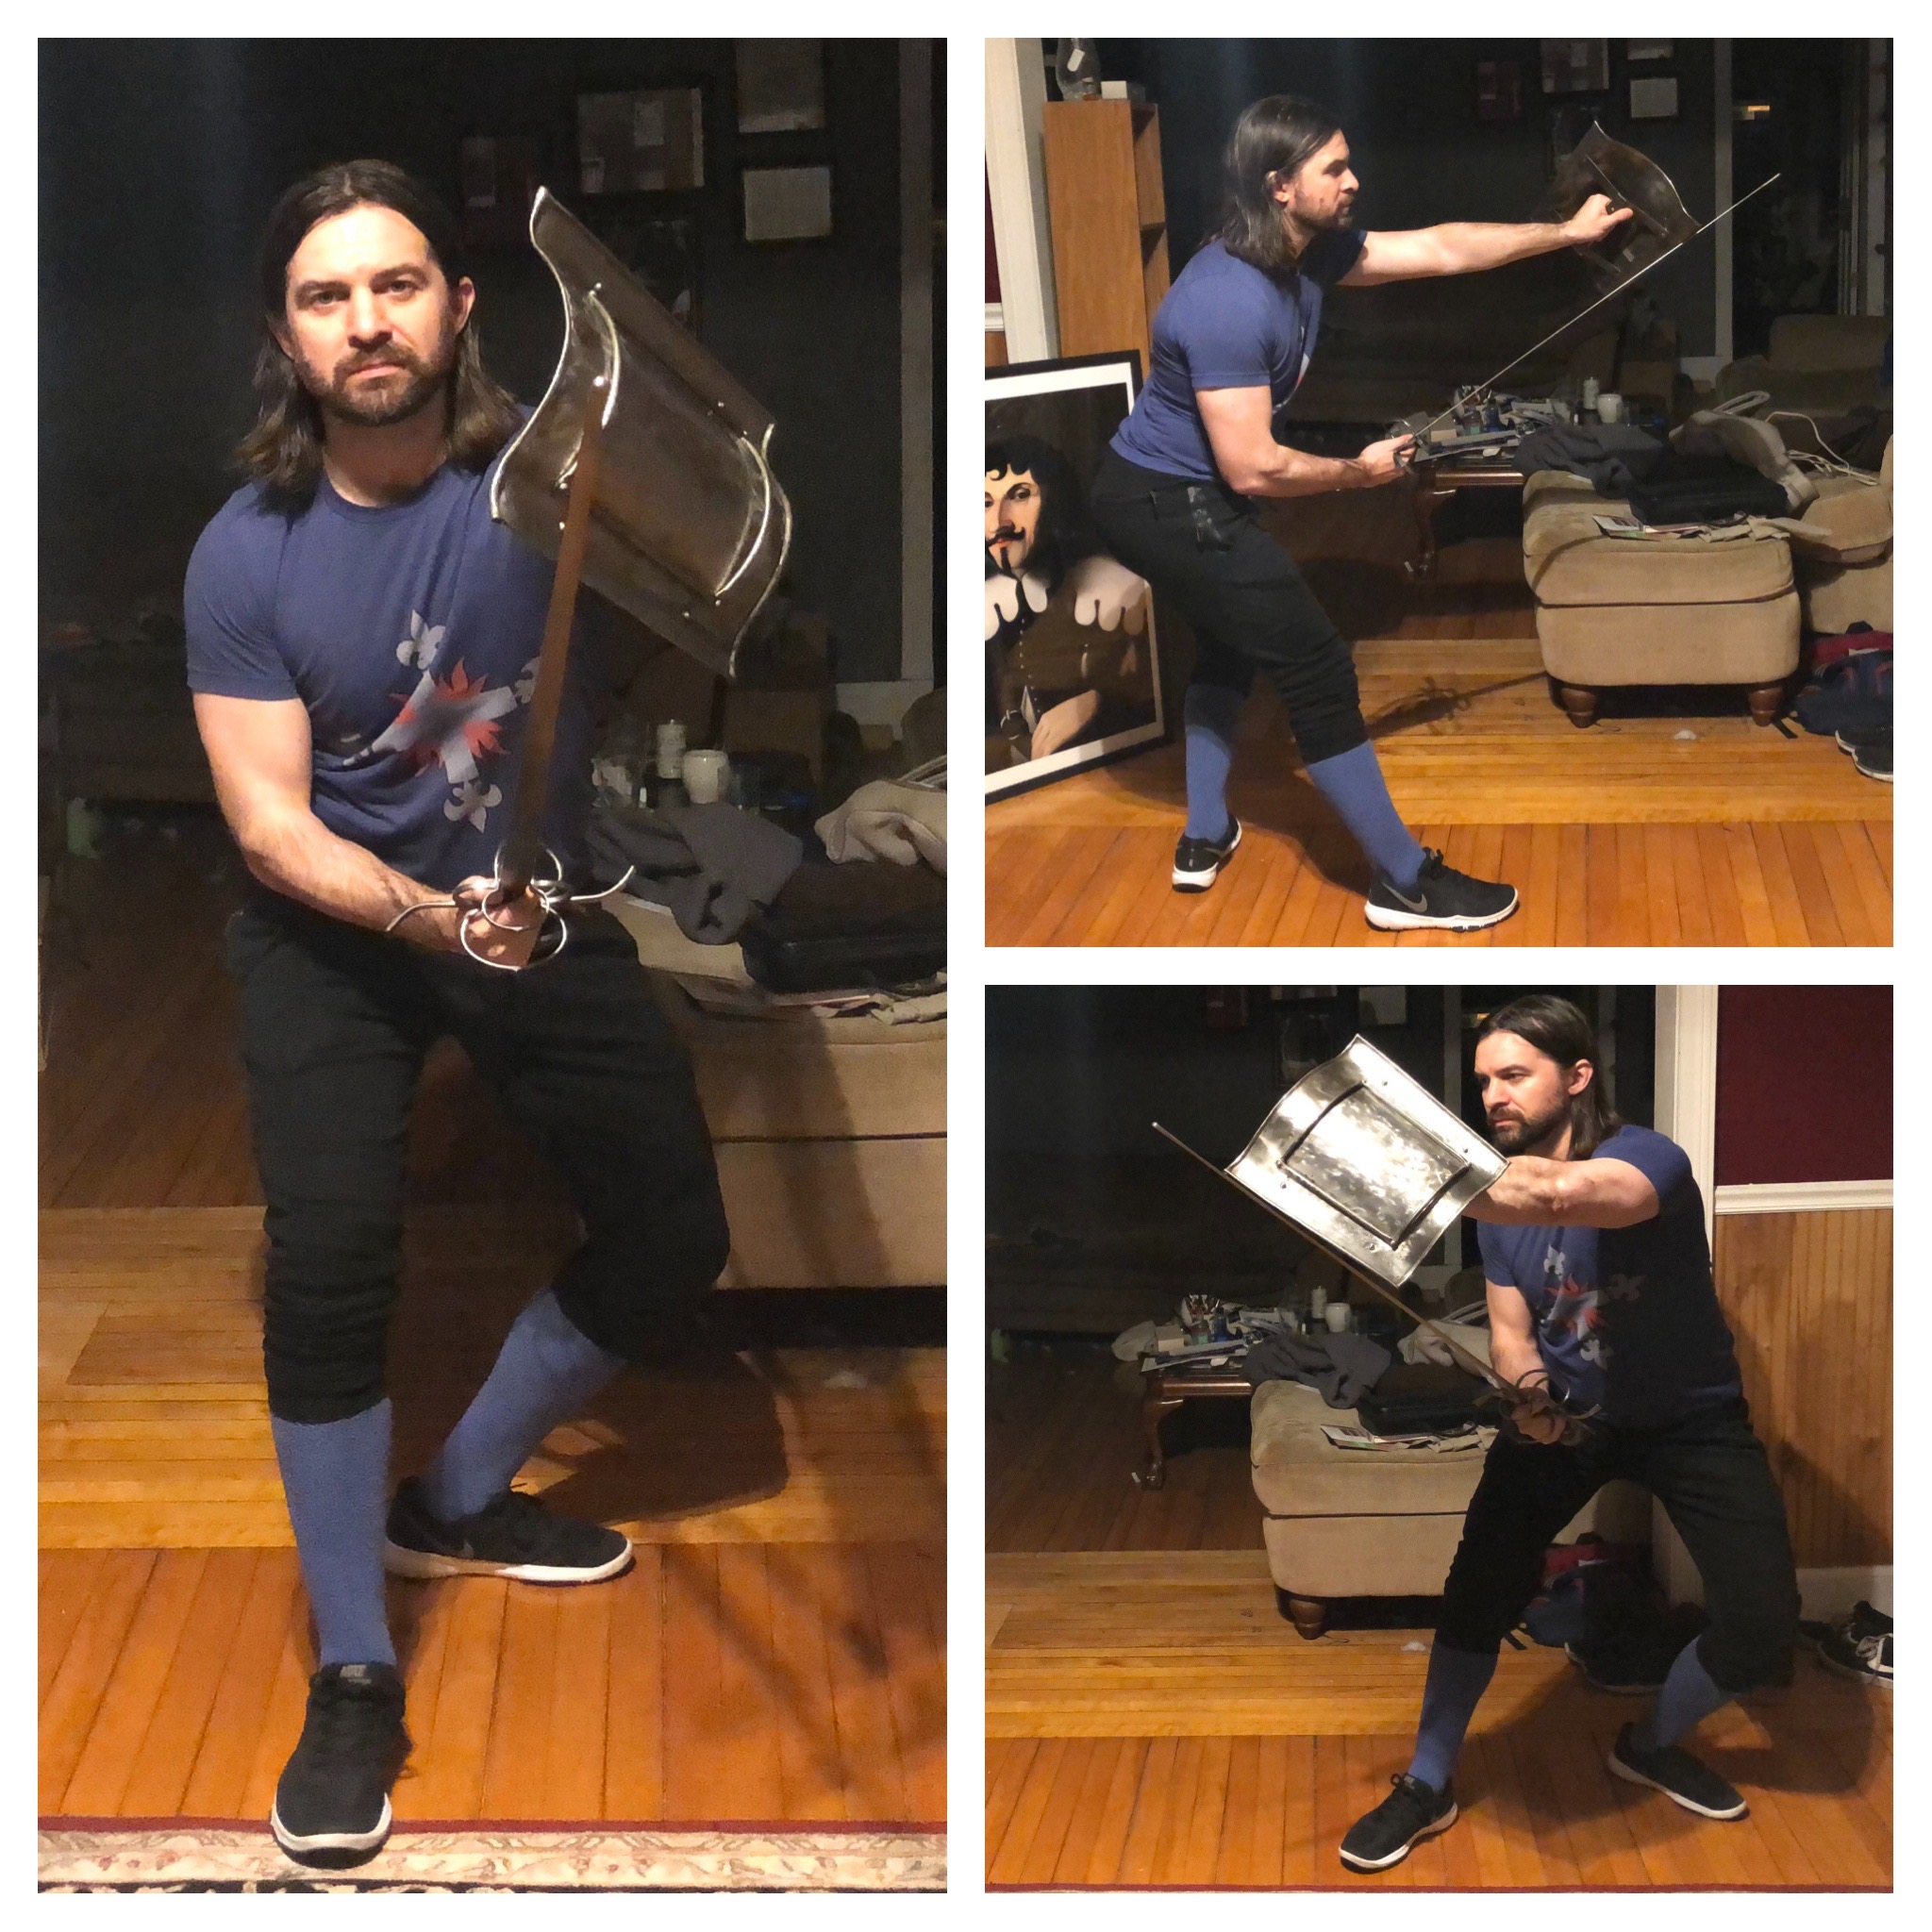
Sword Withdrawn, Buckler Extended
We can also swap which weapon is extended and withdrawn. The benefit of keeping the sword withdrawn is that it is much more difficult for our opponent to find and control our weapon. A lot of fencers will venture too close in attempt to gain physical control over our blade, giving us plenty of opportunities to strike in a closer measure than they’re expecting.
Meanwhile having the buckler fully extended maximizes the cone of defense effect of the arm. It’s very similar to an ice hockey goalie leaving the crease to cut off the other team’s angle, so they see less net to shoot at. With the buckler, we’re cutting off our opponent’s ability to easily strike us without trying to get around our buckler or targa first.
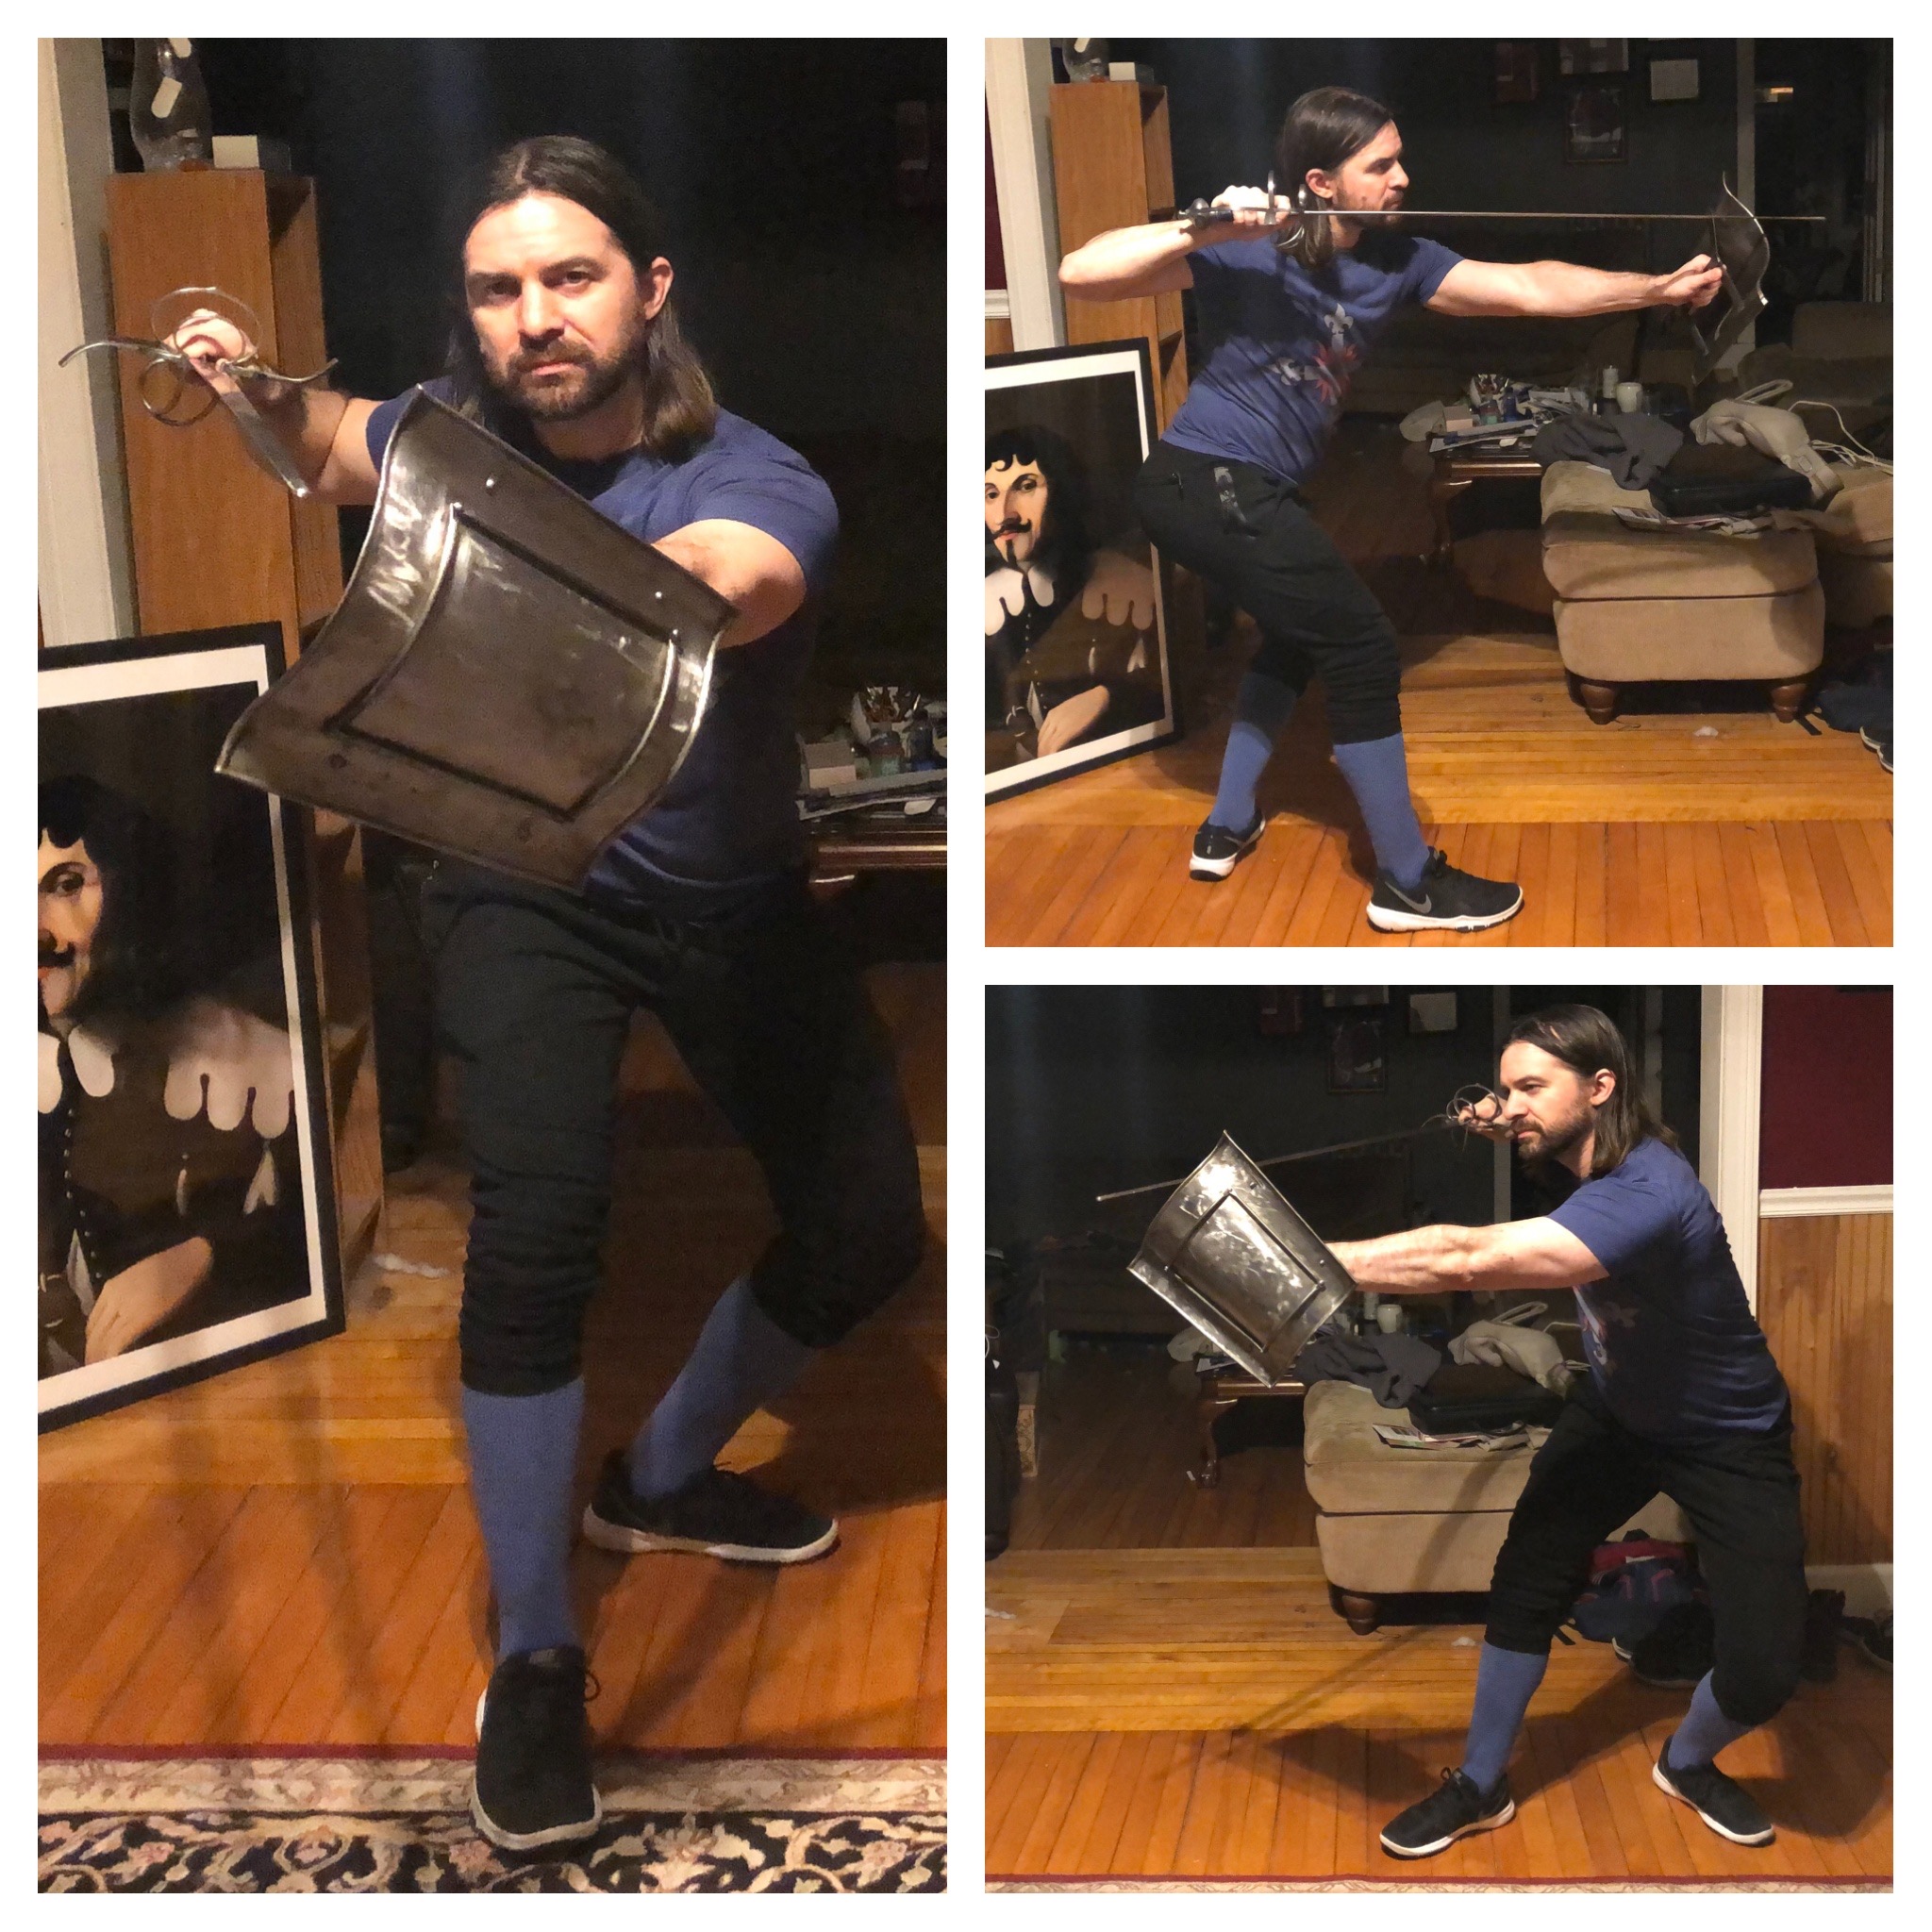
In one of the rapier & buckler classes this month, I had my students create their own buckler-extended postures to see what they came up with. As I wrote on Facebook, I think they nailed it. The compilation photos in this section are what they came up with but I’ve also included an alternate version for some of them. But, again, I think everything shown here are both completely legit.
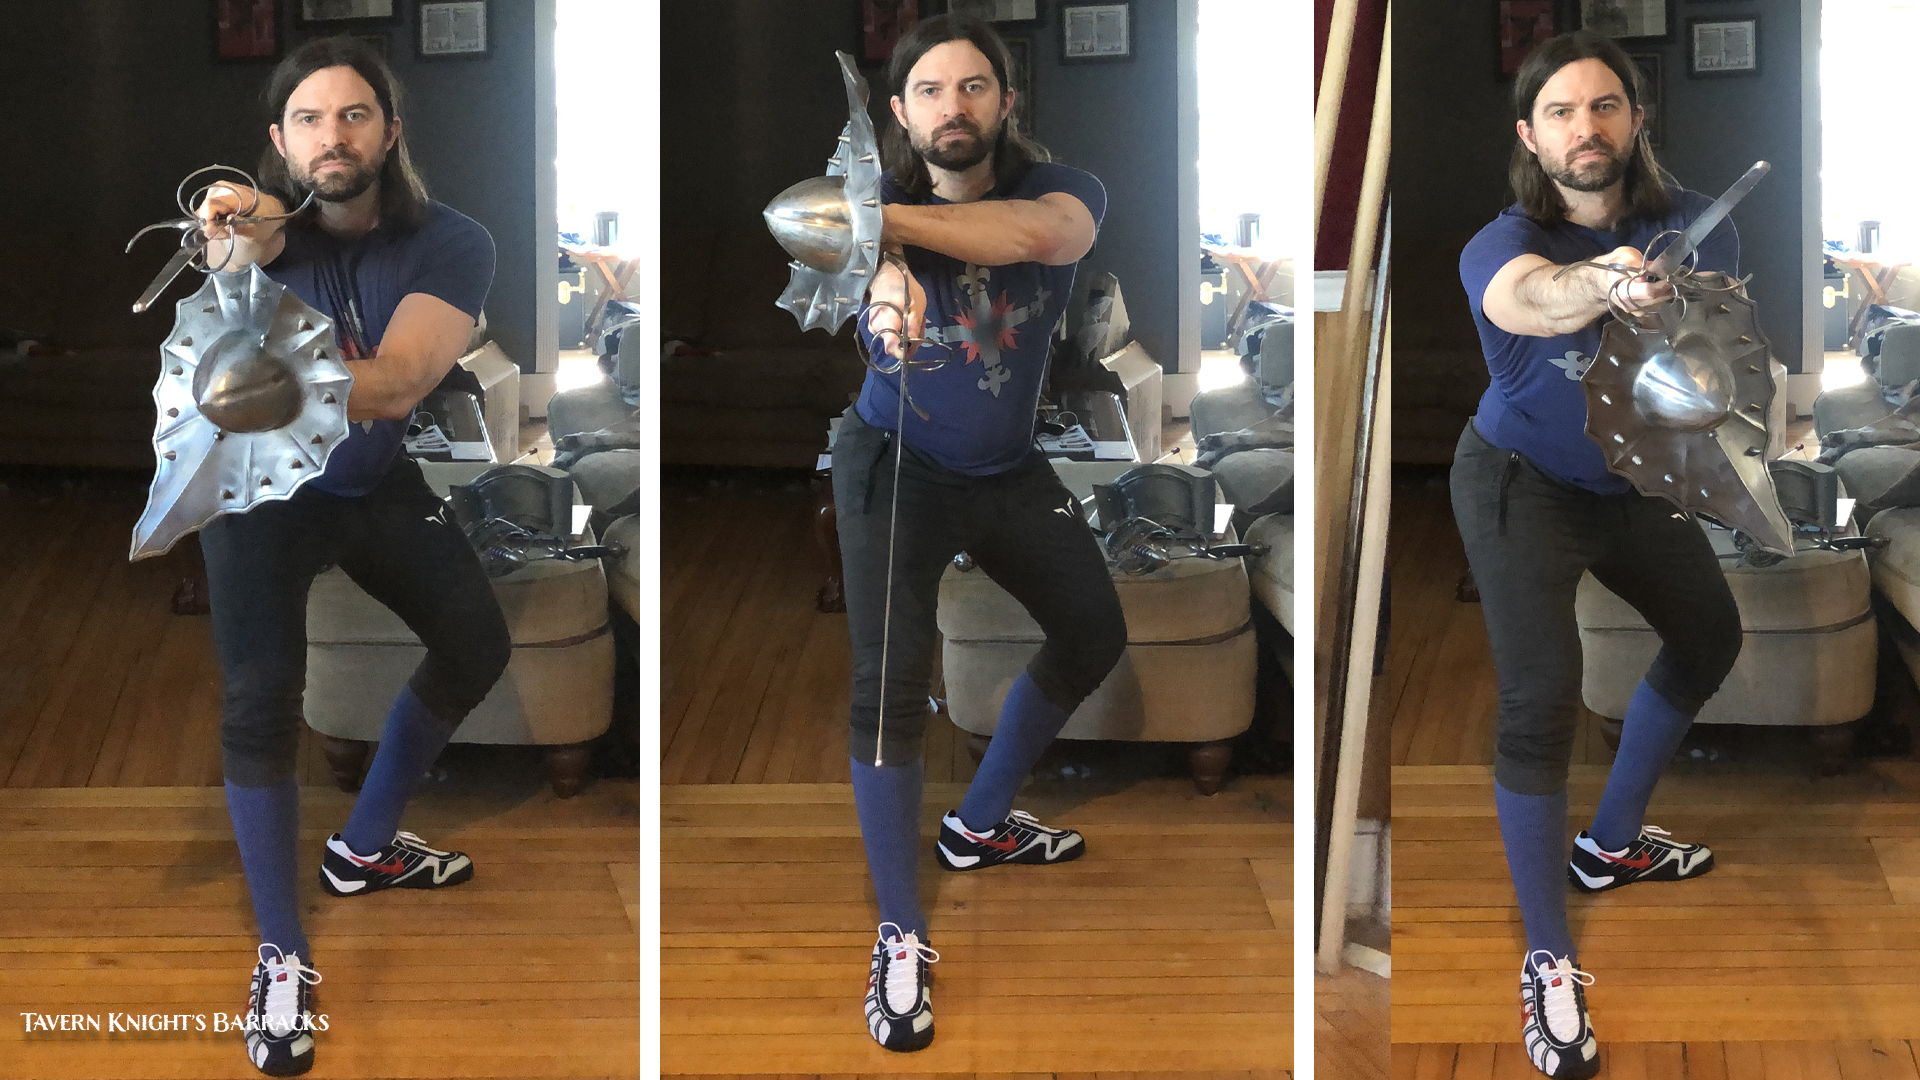
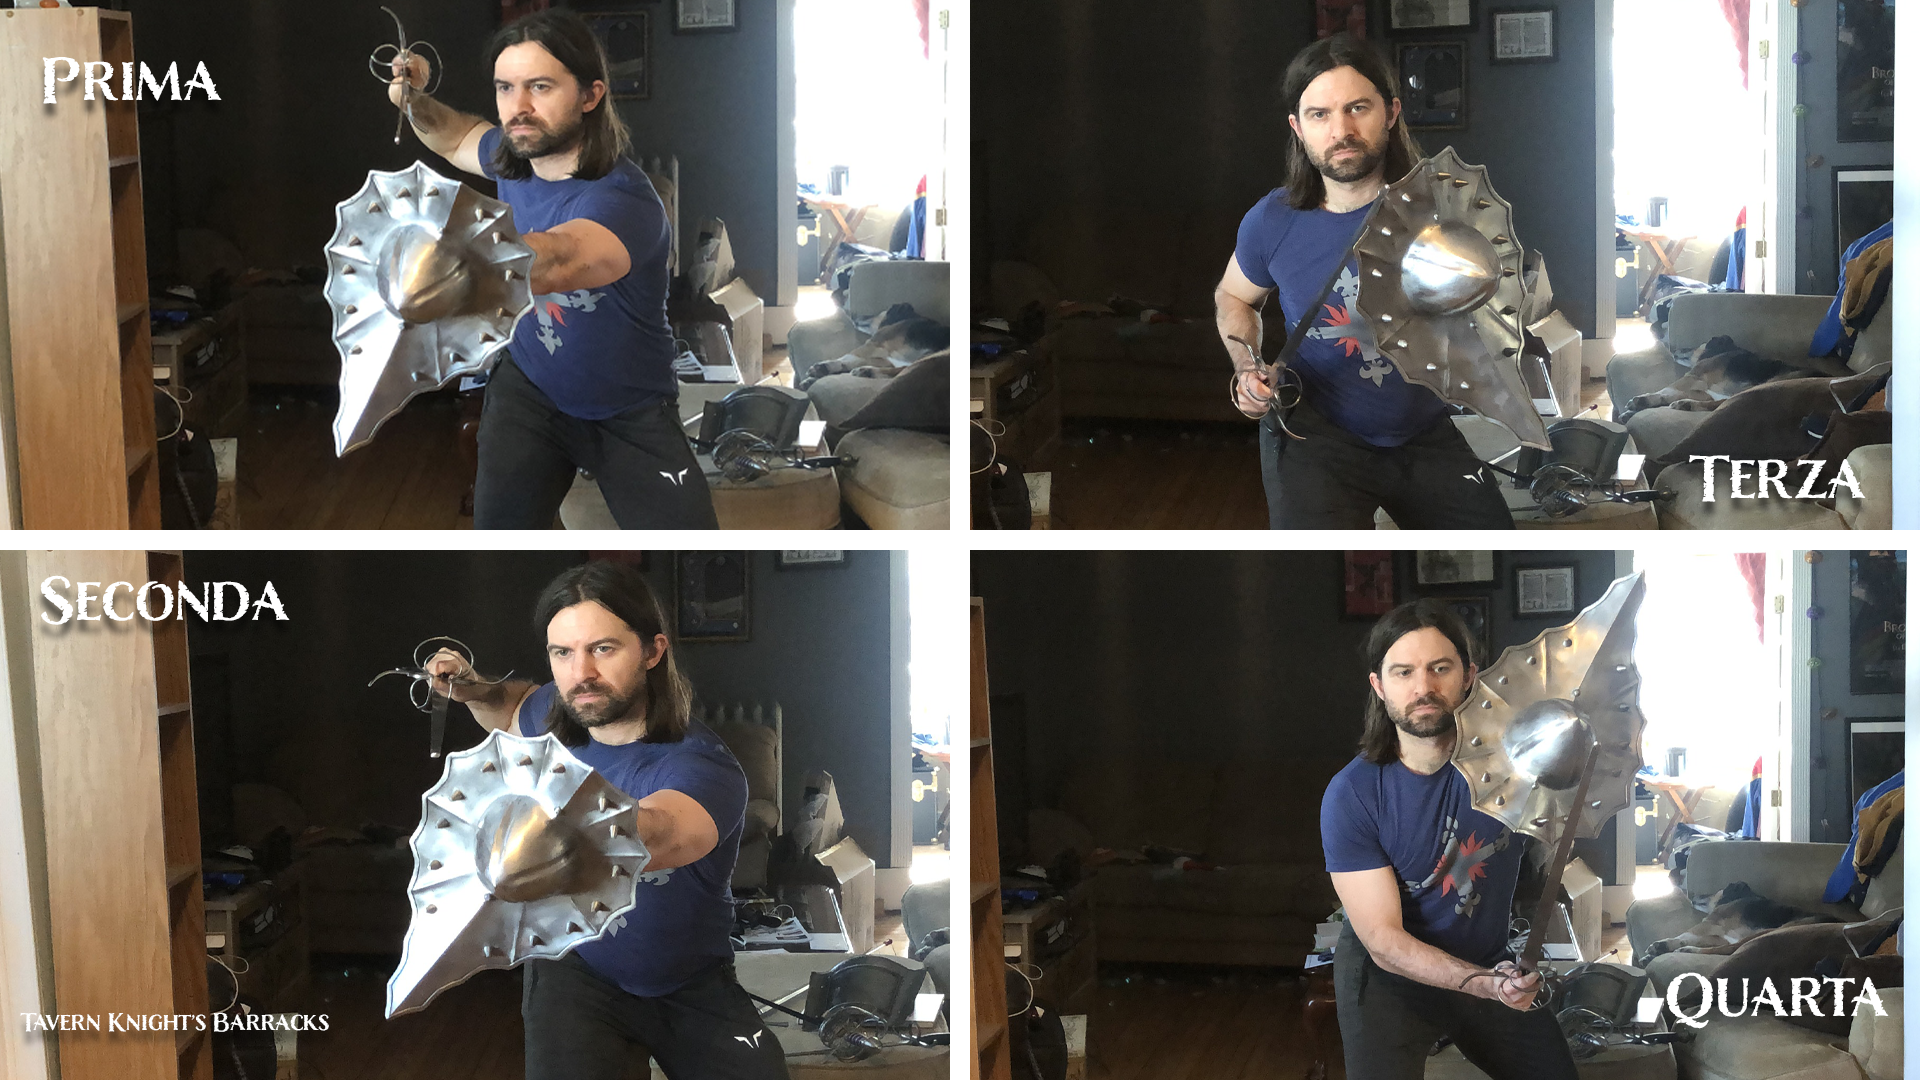
Prima
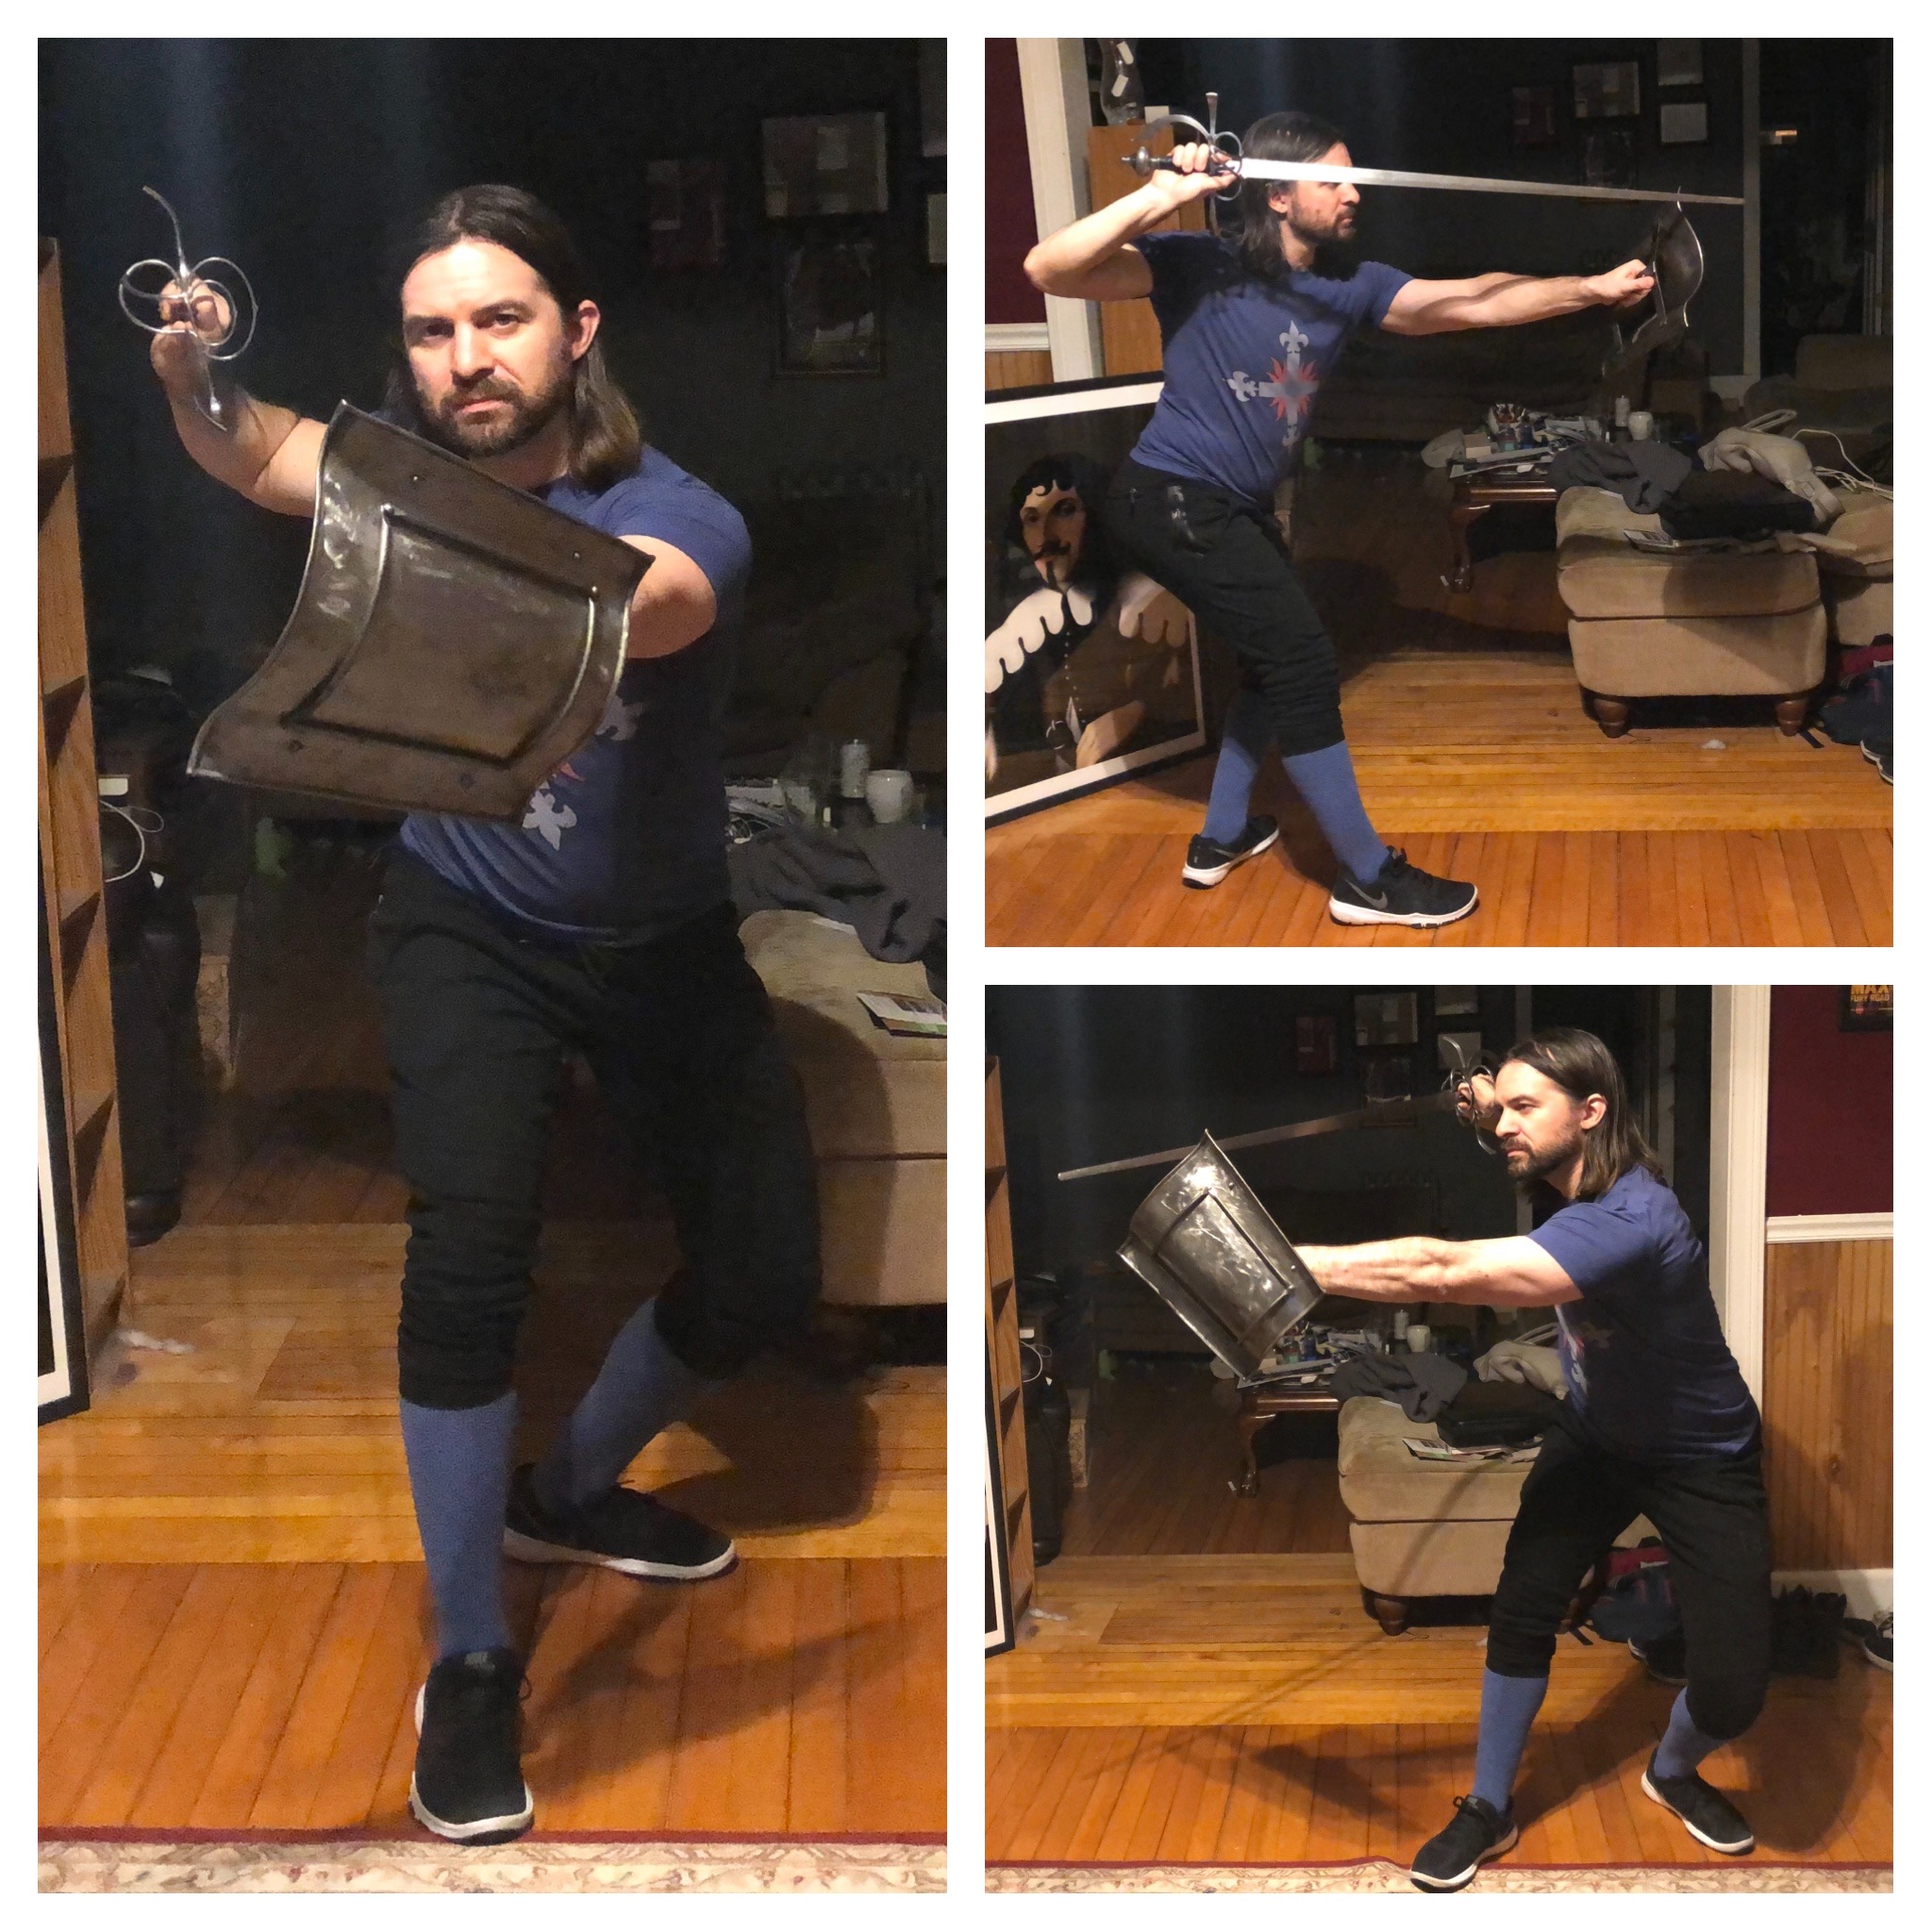
The sword is held at roughly the normal height of prima but the guard is withdrawn to the head (palm of the sword is facing out). I also shorten the distance between my feet in all of these buckler-extended guards. The body is hip-hinged slightly forward with the weight still mostly on the back leg.
This version stringers the outside line. The hand position of the buckler is at 2:00, which also covers a decent amount of the inside line, too, make it a good buckler position for approaching the opponent. The buckler is also extended at shoulder height.
We can also form this same guard but turn the buckler into the 10:00 hand position. This still constrains the outside line but creates a larger invitation on the inside line.

This version is good for trying to get our opponent do disengage and attack in the inside line opening, making them very predictable and open for a counter attack (similar to the earlier GIFs).
I think both versions of this guard are worthwhile.
Seconda
The formation & properties of seconda is just like that of prima, but we rotate the sword so the hand is facing down. The body is still inclined forward with the weight on the rear leg, and the buckler is held at extended at shoulder height.
Like prima, this version does a pretty good job at constraining the outside while not giving much openings to the inside either. So a good guard to approach in.
And like prima, we can rotate the buckler hand into the 10:00 position to shut out the outside line even more and create a bigger, more enticing invitation to the inside line.

Terza
Next up is terza. Again out body is hinged forward a little with the weight on our back leg. The sword is held true edge toward the ground and in front of our lead hip. The sword is crossed in front of our body and meets with the buckler that is held at shoulder height. The hand is held in the 2:00 position.
This guard constrains the inside line pretty well. There is a little opening in the low-inside line but because of our hip-hinge, it’s a far target. The more enticing opening for our opponent would be the high-outside line.
Personally, I would only do this guard with the buckler in the 2:00 position as turning to 10:00 won’t create a better opening to the outside line and doesn’t protect the inside line any better.
Quarta
Creating targa-extended quarta is similar to terza. The body is in the same posture and buckler is still held extended at shoulder height and in the 2:00 position. The key difference here is the sword is turned palm up and brought across the body.
Unlike terza, the entire inside line is stringered and it creates a bigger, more obvious opening to the outside line.
Other Guards
There are tons of other guard formations you can make, especially if you start adapting Fabris to buckler. So have fun creating buckler guards and experiment.
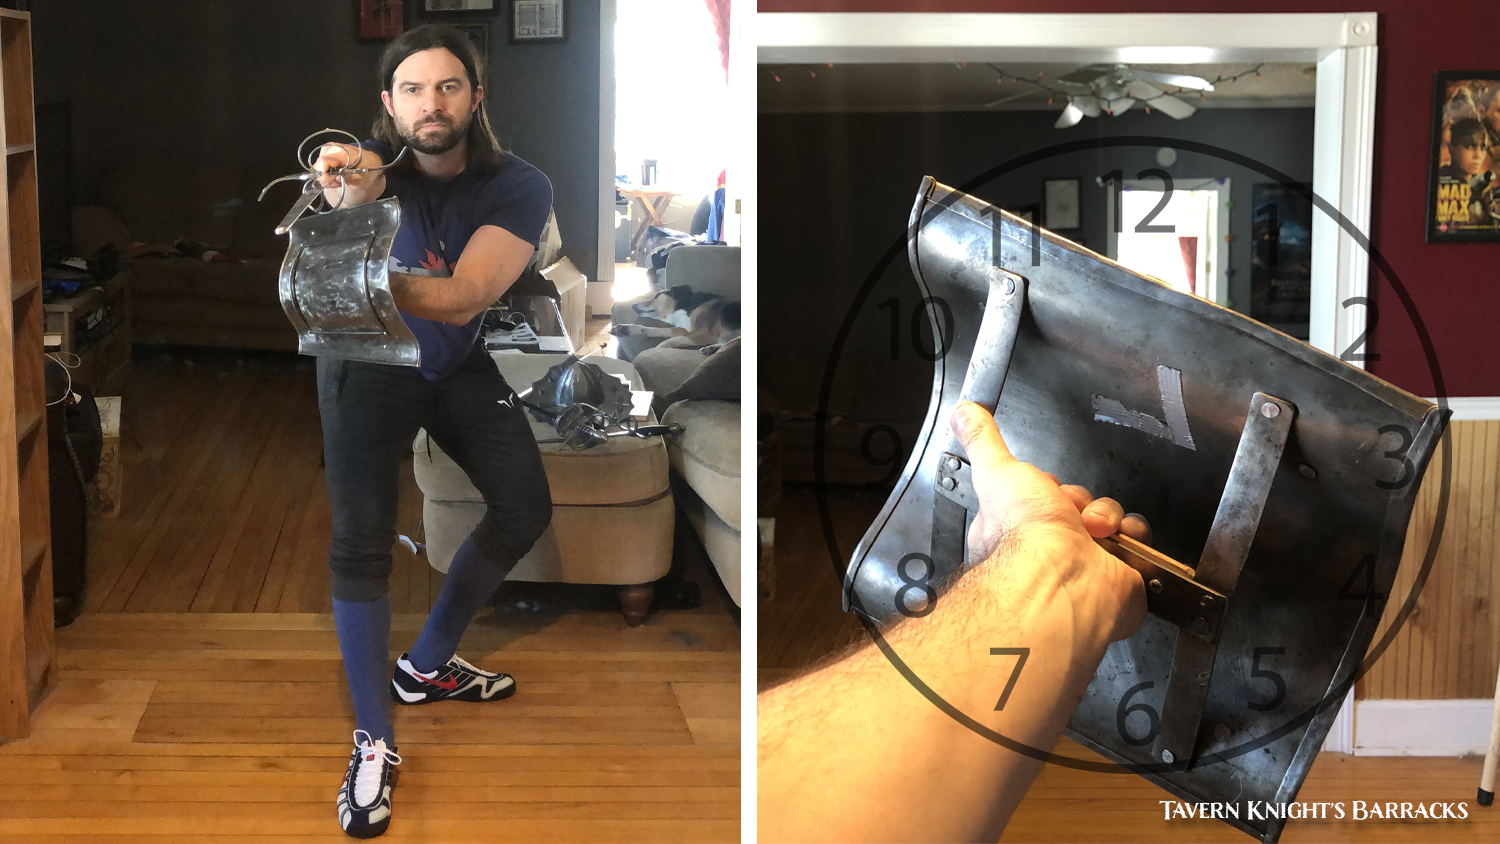
Striking with Closed Guards
Regardless if you start off in a sword-extended/buckler-withdrawn guard or the opposite, you’ll still want to finish your attacks and simple counterattacks in closed-guards. Closed-guards are rapier postures that cover both the high & low line of either the inside or outside line at the same time. They fully “close the door” at your opponent’s chance of striking you on that line, forcing them to disengage to the opposite line or withdraw, giving you a tempo.
The closed-guards can be done with any weapons form combo. We use them regularly with rapier & dagger, and I make heavy use of them with single rapier, too.
In its simplest form, the sword is still doing the defensive work while striking, while the secondary-arms are there in support to fully shut out the line. However, the secondary-arms can also be controlling our opponent’s weapon while leaving the sword free. Regardless, the key in these forms is to make sure there’s not a gap between the sword and the off-hand item and that the two weapons are aligned in a way to fully close out the high & low lines.
We can adapt this same idea to buckler. The earlier GIFs already show how to strike in closed-seconda and closed-quarta with the lunge. But let’s look at the closed guards a little more and from different angles. These photos are shown in the Forward Guard/Offensive Posture, but are the same when lunging or even performing passing lunges.
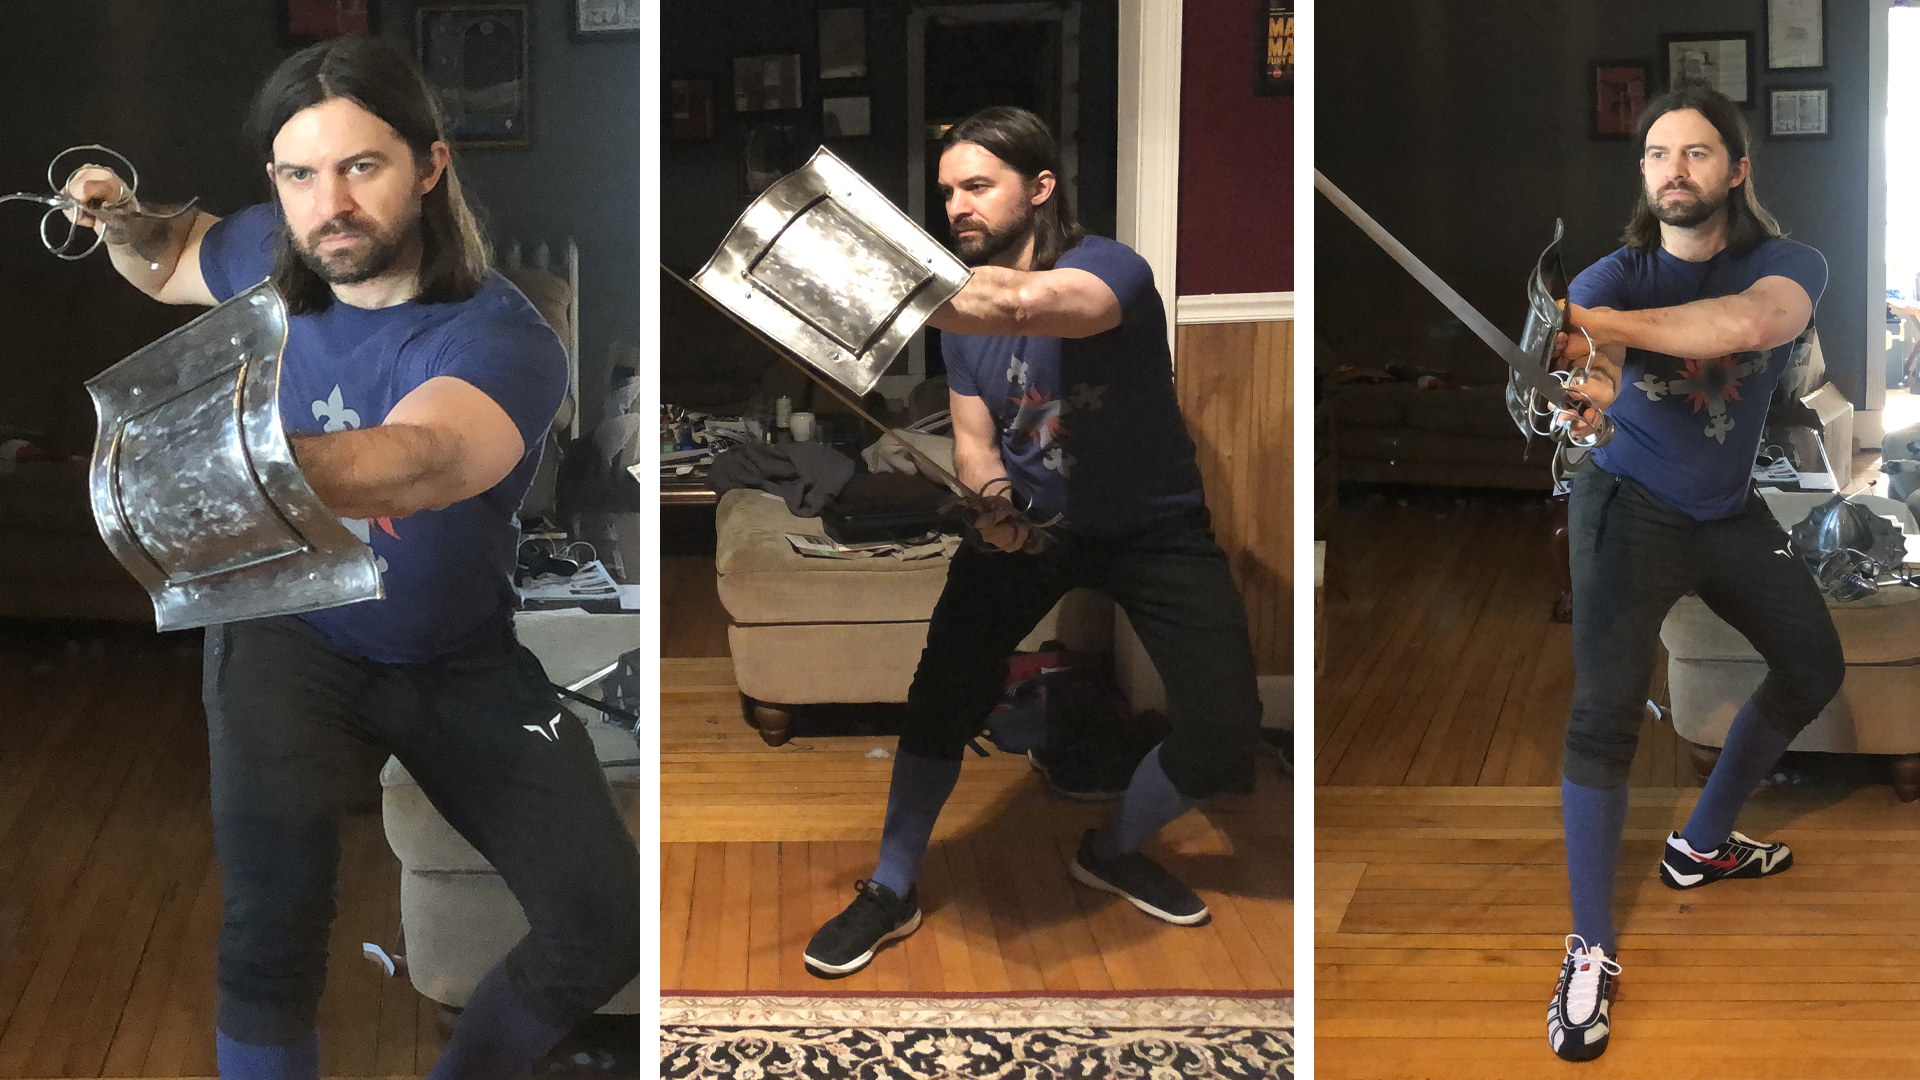
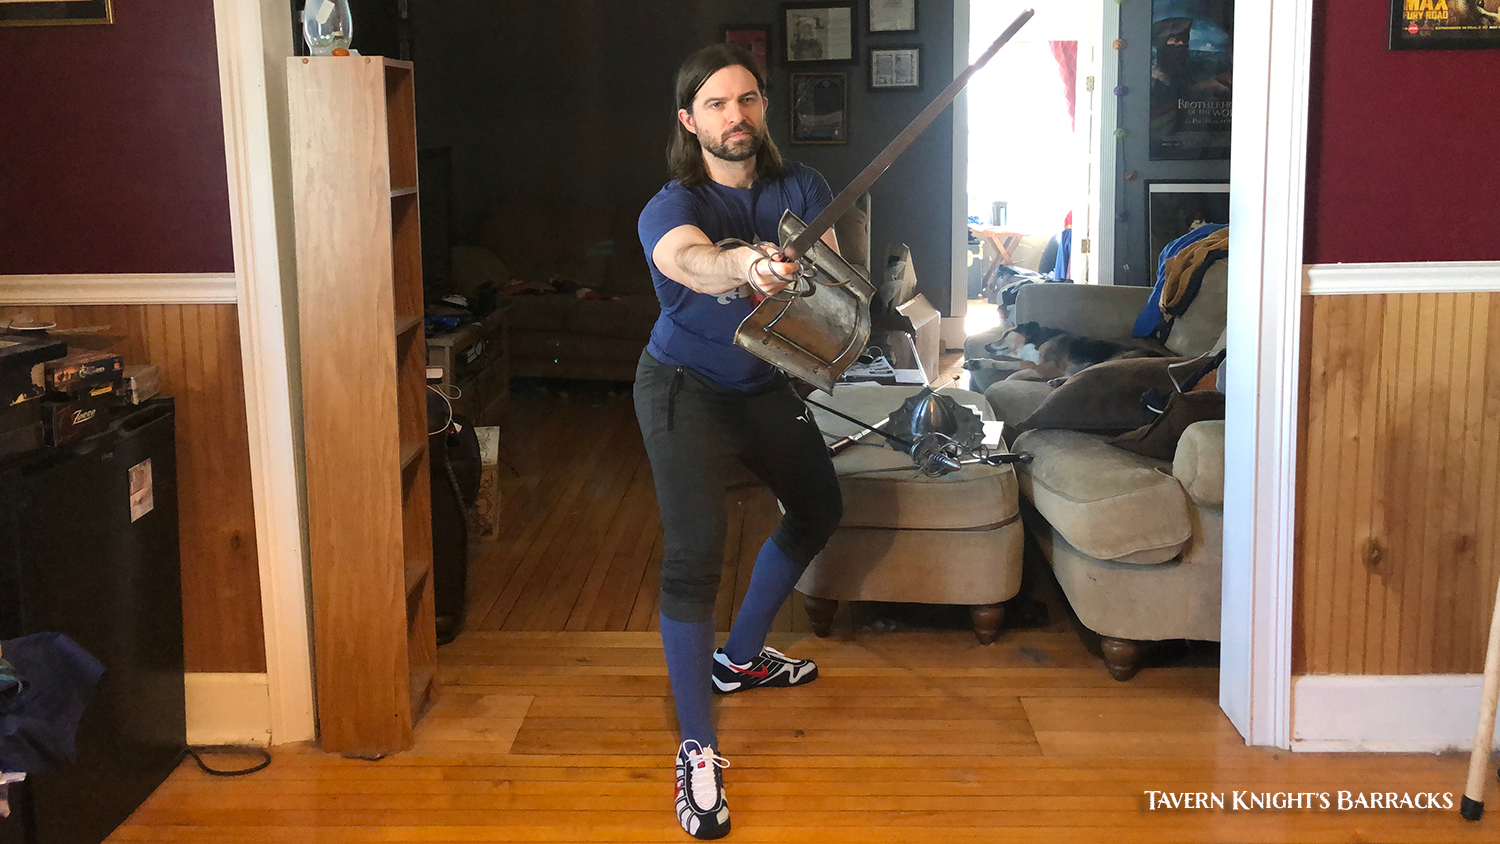
Prima & Seconda
The position of closed-prima & seconda are more or less the same. The difference is how the sword is held. In prima, your knuckles face the ground and in seconda, your palm faces down.
In closed-seconda, the sword is striking & covering the high outside line while the buckler covers the low outside line. The buckler hand is in the 10:00 position.
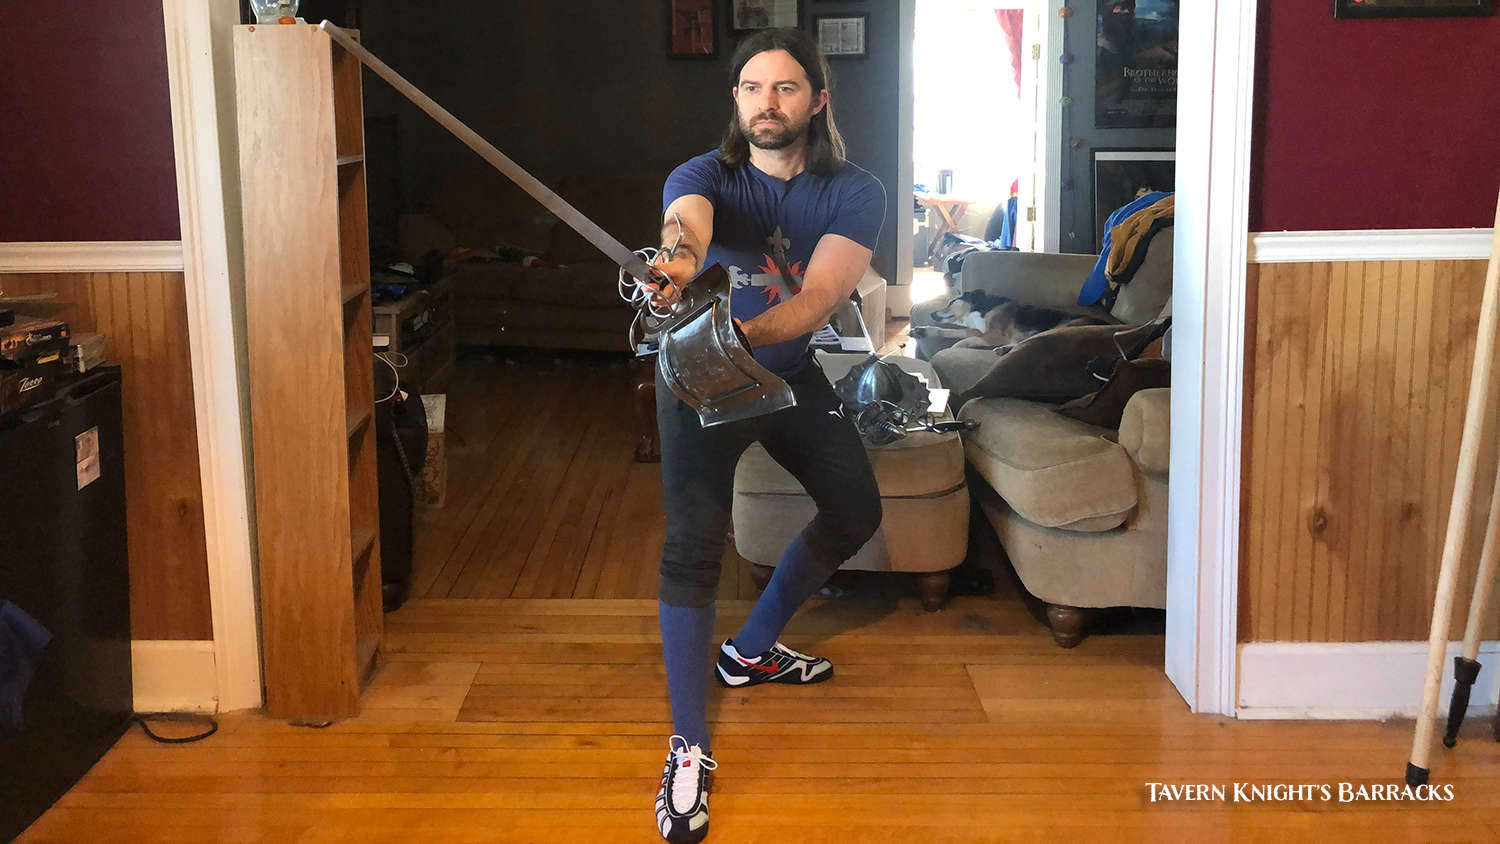
Terza
In closed-terza with buckler or targa, the defensive item is “draped” over the sword-arm (like in finding the blade to the outside). The buckler is covering the high line and the sword covers & strikes low.
A thing to keep in mind with this guard… try to keep the buckler elbow down & in, tucked in. It’s easy for the arm to drift up toward the sky, especially if you have tight triceps or rear delts, shoulder impingement or rotator cuff issues. The elbow should be no higher than parallel to the ground.
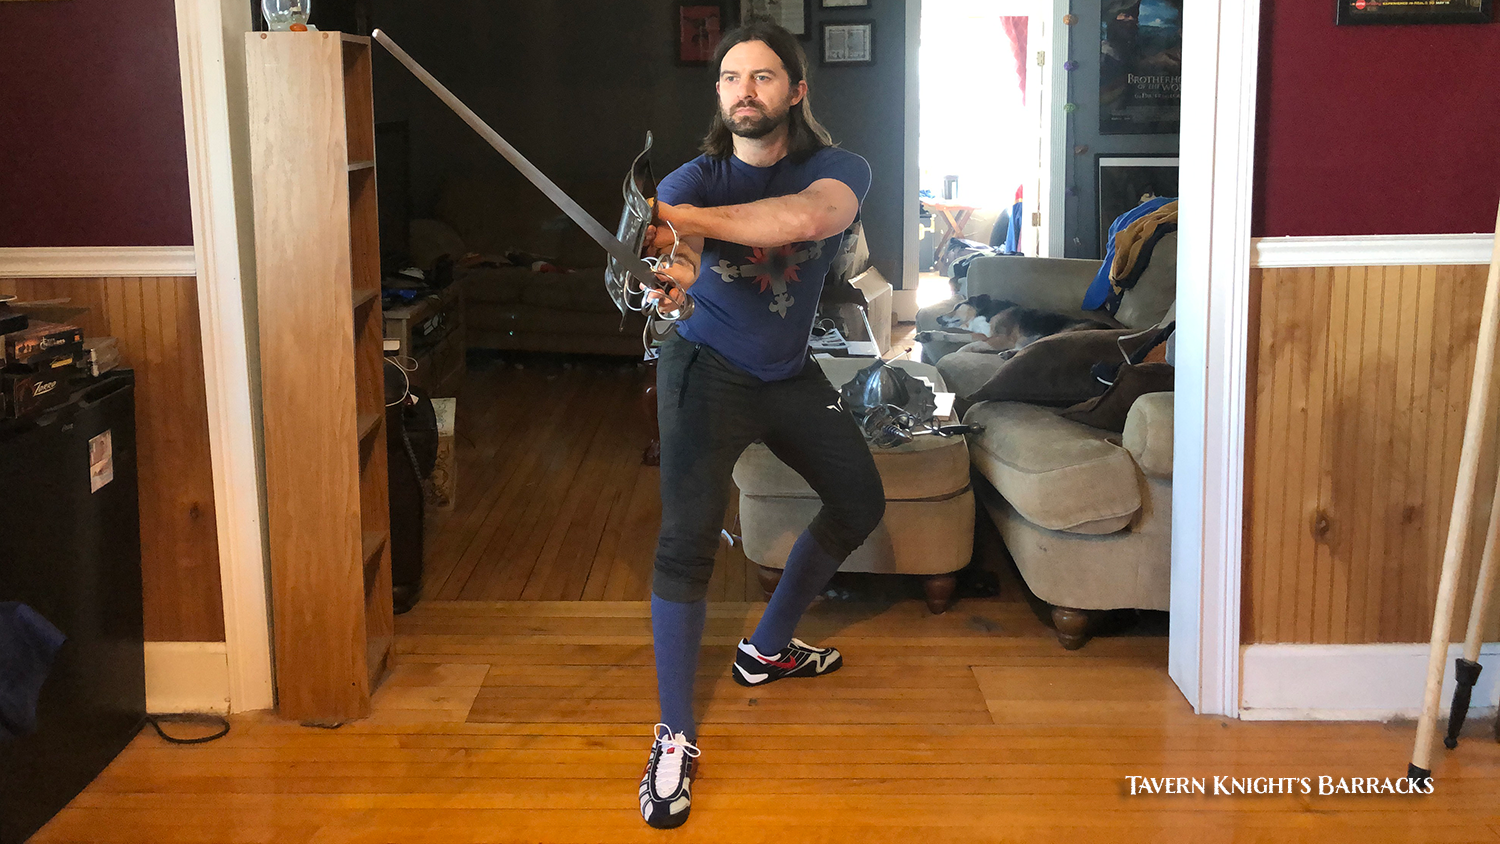
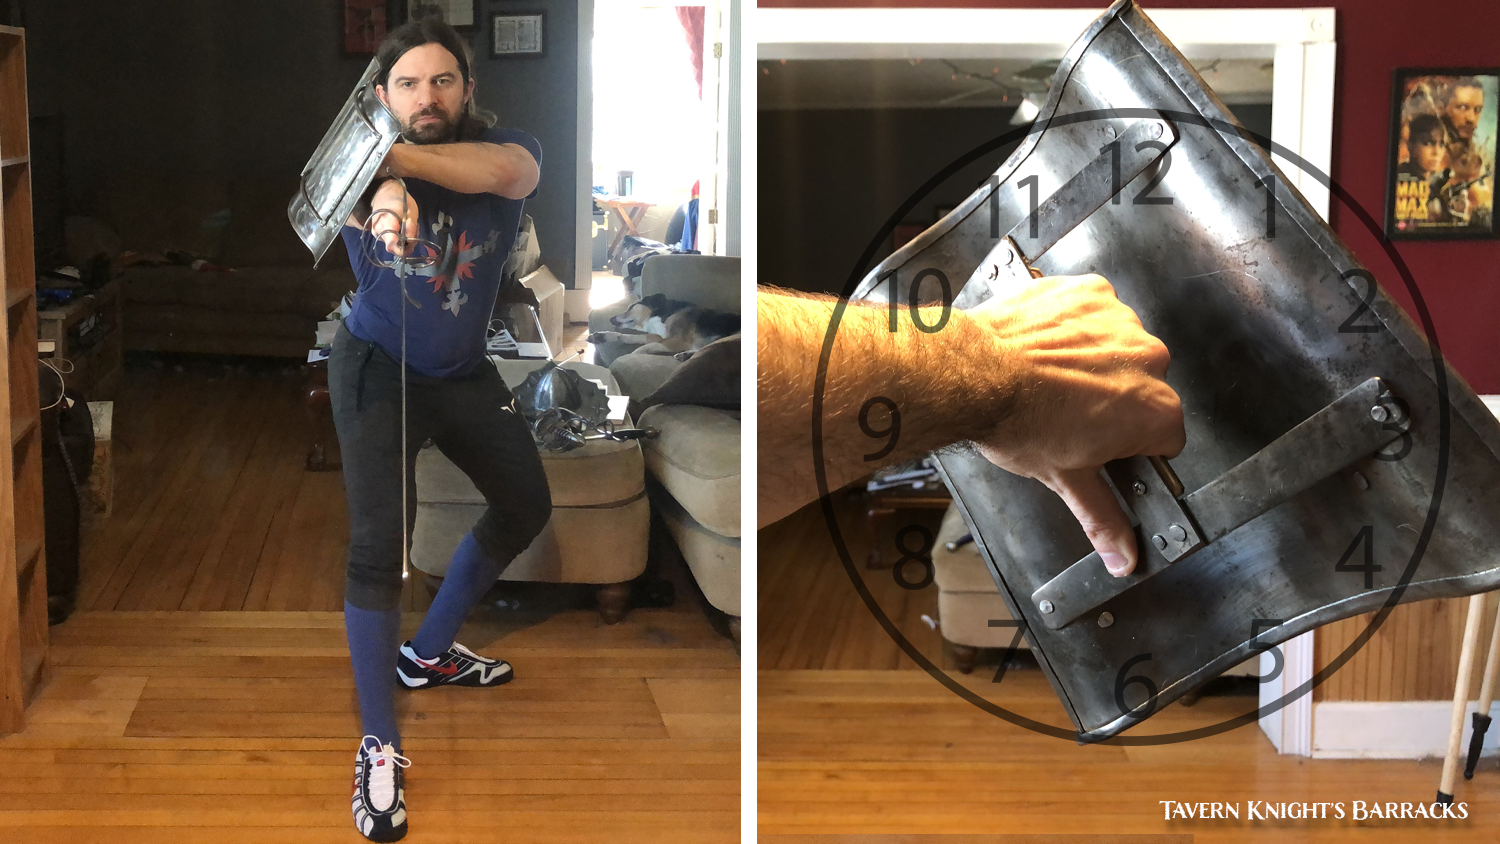
Quarta
In closed-quarta with the buckler, if we strike with the sword high the buckler should cover the low line. The buckler hand is in the 2:00 position.
If we strike with the sword low, the buckler covers the high line.
Rapier with the Talhoffer Buckler
One thing to also keep in mind is the shape/form of your buckler. Form follows function. What advantages does your buckler shape give?
For example, with my wife’s (Kate Sokol) talhoffer buckler, I change my hand positions slightly to maximize the use of the buckler’s long tail. This covers more of the low line (and sometimes high line) and (potentially) creating for a bigger disengage by the opponent to free their blade.
Here are closed-guards with the talhoffer.
Maximizing the use of the tail is especially effective when holding the talhoffer buckler extended.
Prima & seconda don’t look much different than with a buckler or targa. However, terza is held closer to a 1:00 hand position so the tail covers more of the low line. With quarta, I hold the buckler in a 5:00 position so it covers my entire high line, including the head.
Class Video
Here’s video of the third Rapier & Buckler class from 3/5/21, where the class breaks up into four separate groups to design their own buckler-forward rapier guards and build a simple play from it.
DONATIONS: If you found this blog post & class video useful, please consider a small donation so I can continue to produce rapier & other historical martial arts content. Donate at https://www.paypal.me/thetavernknight
Credit to Academie Duello for first introducing me to the clock/timestamp metaphor for the buckler positions.